
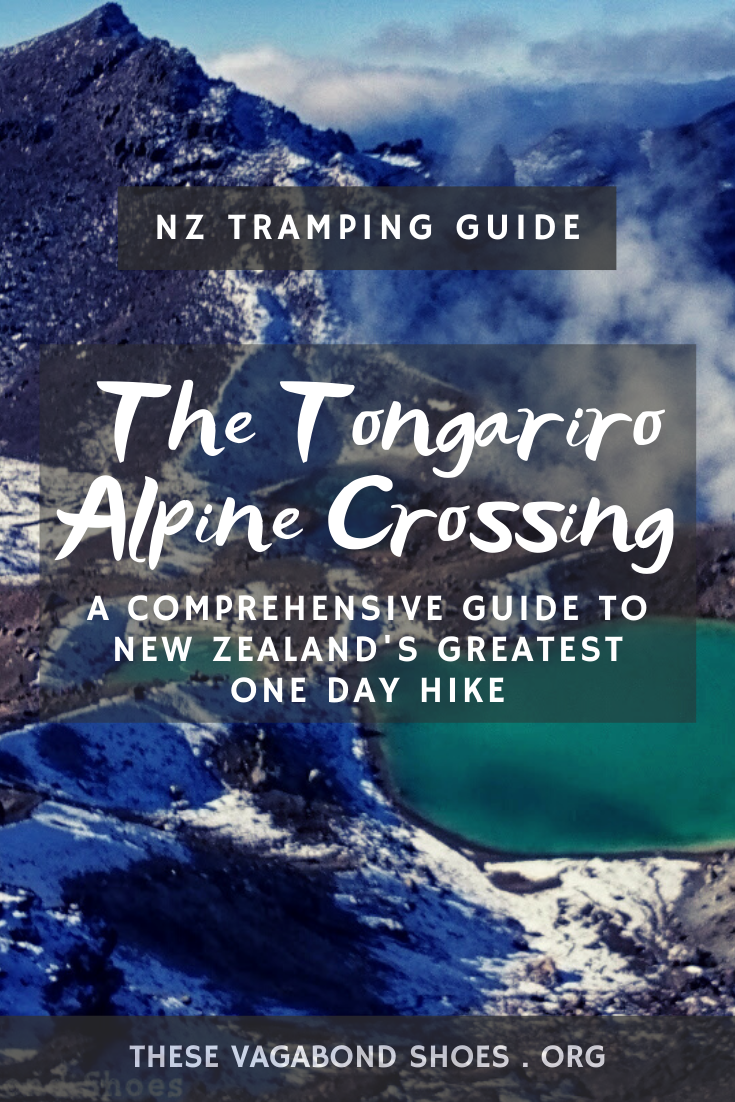
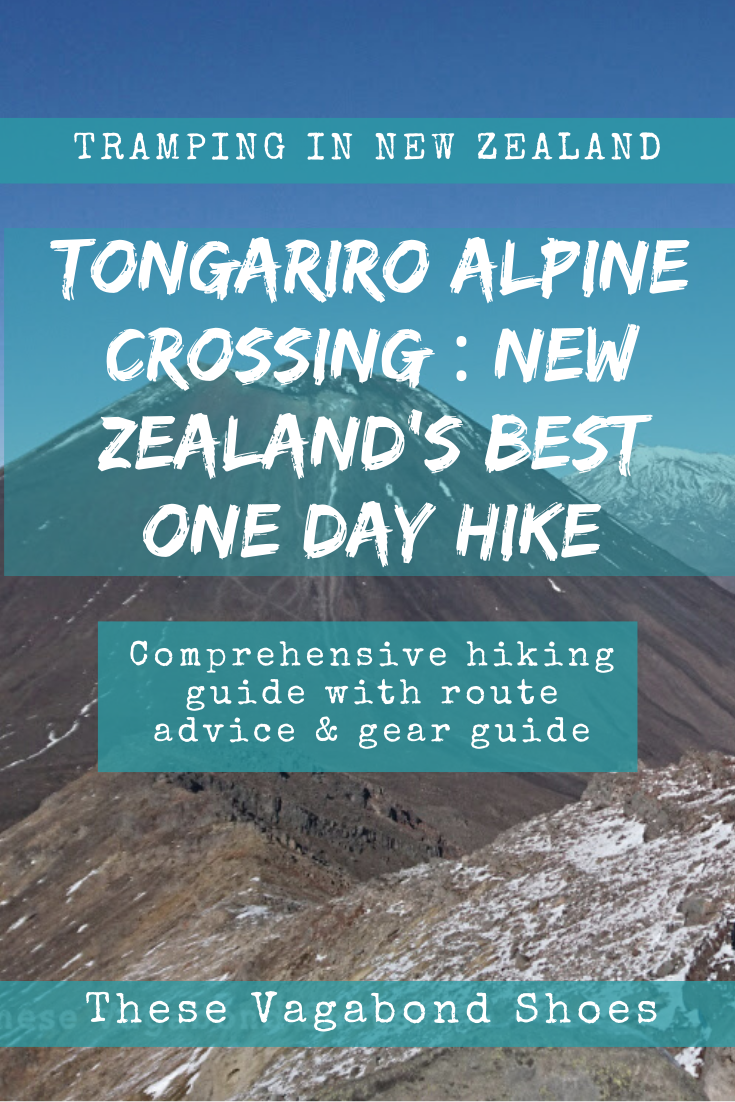
The Tongariro Alpine Crossing lays claim to the title of the best single day hike in New Zealand, and perhaps even the most awe-inspiring anywhere in the world. Winding through New Zealand’s oldest National Park, a dual World Heritage Site for natural and cultural significance, this atmospheric hike is a classic Kiwi experience.
The route traverses glaciated valleys, cinder-filled deserts, and meadows of unique alpine vegetation to enter an otherworldly landscape of steaming geothermal vents, ancient lava flows, jewel-coloured crater lakes in the fiery heart of a volcanic caldera.

Known just as the Tongariro Crossing until 2007, the name was changed to more accurately reflect the mountain conditions hikers encounter, but it remains a firm fixture on many New Zealand bucket lists. The huge popularity of the route means it can get busy on the trail, but also that there’s a great support infrastructure for hikers keen to take on the challenge.
After completing the hike for myself, I’ve compiled a guide to hiking the Tongariro Alpine Crossing with all you need to know to plan your hike.
Tongariro Legends
Known to Māori as Te Kahui Tupua, the sacred peaks, this wild volcanic plateau in the centre of New Zealand’s North Island has a deep significance. According to legend, the volcanoes of North Island were once a band of great warriors who gathered on the shores of Lake Taupo. The male volcanoes were all deeply in love with the beautiful Pihanga, stunning in her cloak of forest green.
One night they all fought for her love in a mighty battle, belching forth their smoking anger and turning the sky dark. The earth shook for days, and fire and ash and ballistics rained from the sky. When the skies finally cleared, Tongariro was revealed as the victor, with the lovely Pihanga standing close by his side. Ngāuruhoe and Ruapehu acknowledged Pihanga’s choice of Tongariro, and retreated back a respectable distance.
Taranaki took defeat particularly badly, and wild with grief and jealous rage ripped up his roots to follow the setting sun to the west, gouging the deep scar of the Whanganui River on his way. He sits to this day on the coast, brooding in splendid isolation. Though who knows if one day in the future he may return to claim the heart of Pihanga?

A Guide to the Tongariro Alpine Crossing
There are two options for completing the Tongariro Crossing; either starting at the Mangatepopo car park and ending at Ketetahi car park, or the reverse route, starting at Ketetahi and ending at Mangatepopo. The first is the most popular option, as the reverse route involves a greater height gain from the trailhead.
At Mangatepopo, trampers are already at an altitude of 1,100m before starting to ascend the track. The route reaches its maximum height of 1,886m crossing the Red Crater, before descending a volcanic scree slope to the stunning Emerald Lakes. Take care hiking on this route, as scoria scree can be unstable underfoot, and at the beginning and end of the season there can often be ice and snow on sections of the track.
The Alpine Crossing is also part of the three day Tongariro Northern Circuit tramping route, and usually completed as the second day for hikers starting and finishing in Whakepapa.
Tongariro Alpine Crossing Overview
- Route length: 19.5km (12.1 miles) one way
- Approximate hiking time: 7-8 hours
- Start: Mangatepopo car park (1,120 metres / 3,675′)
- Finish: Keteahi car park (765 metres / 2,510′)
- Highest point: Red Crater (1,886 metres / 6,188′)
- Difficulty: challenging
Mangatepopo Car Park to Soda Springs (approx. 1.5 hours)
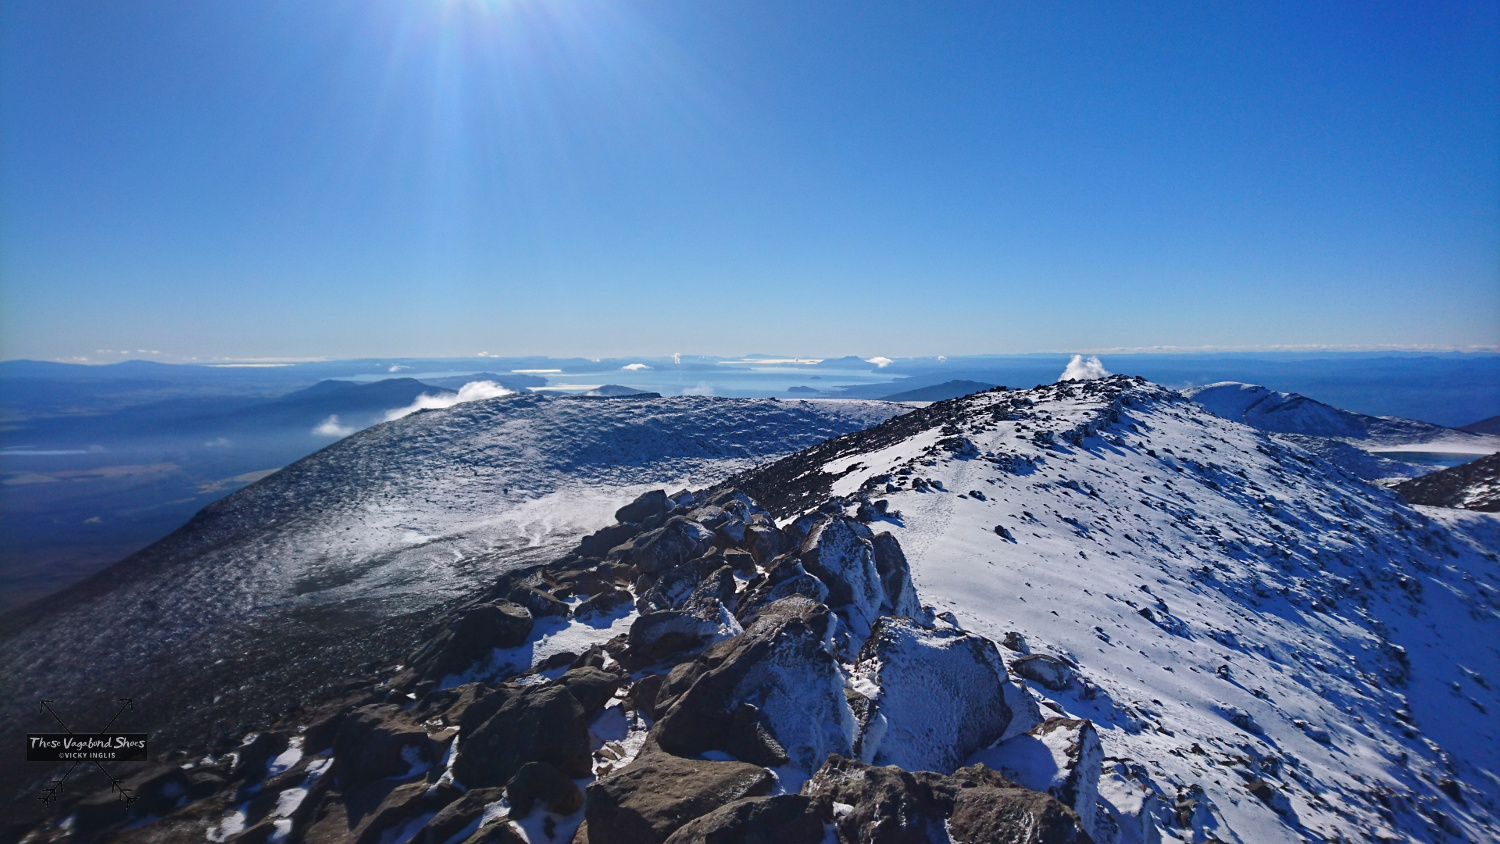
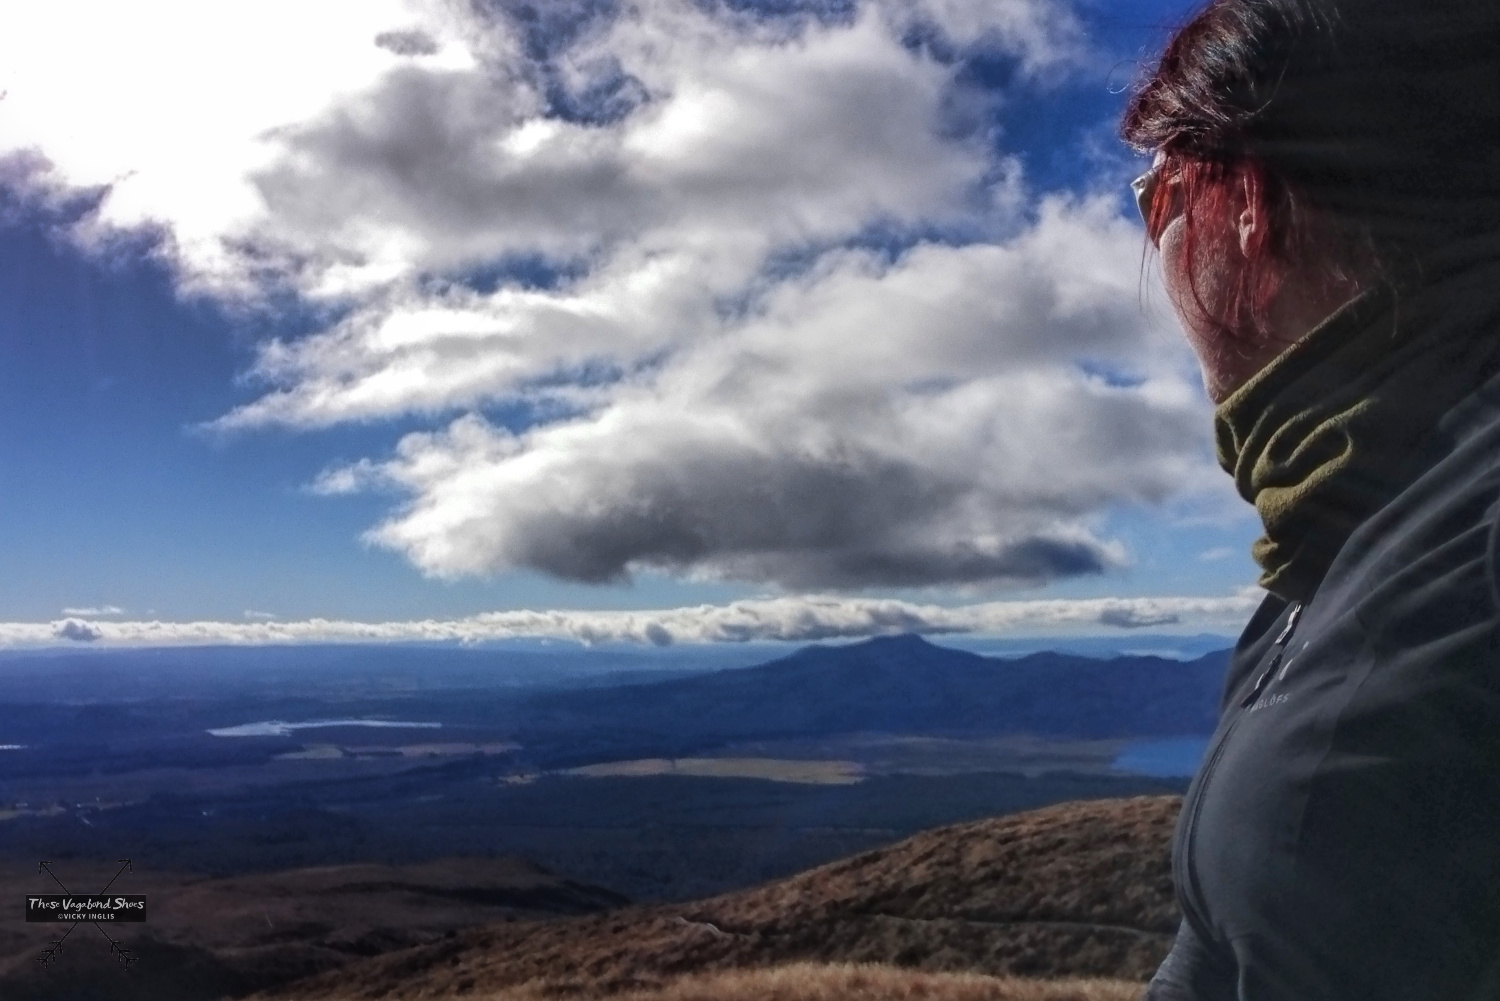
The first part of the trek is an easy-going warm up for what comes later, a deceptively flat start to the mountain following a well waymarked gravel trail through the tussock grassland towards the imposing sight of Mount Ngāuruhoe, with Tongariro behind. Looking back over my shoulder I can see snowcapped massif of Ruahepu, the tallest volcano in Tongariro National Park, rising up from the rolling plateau.
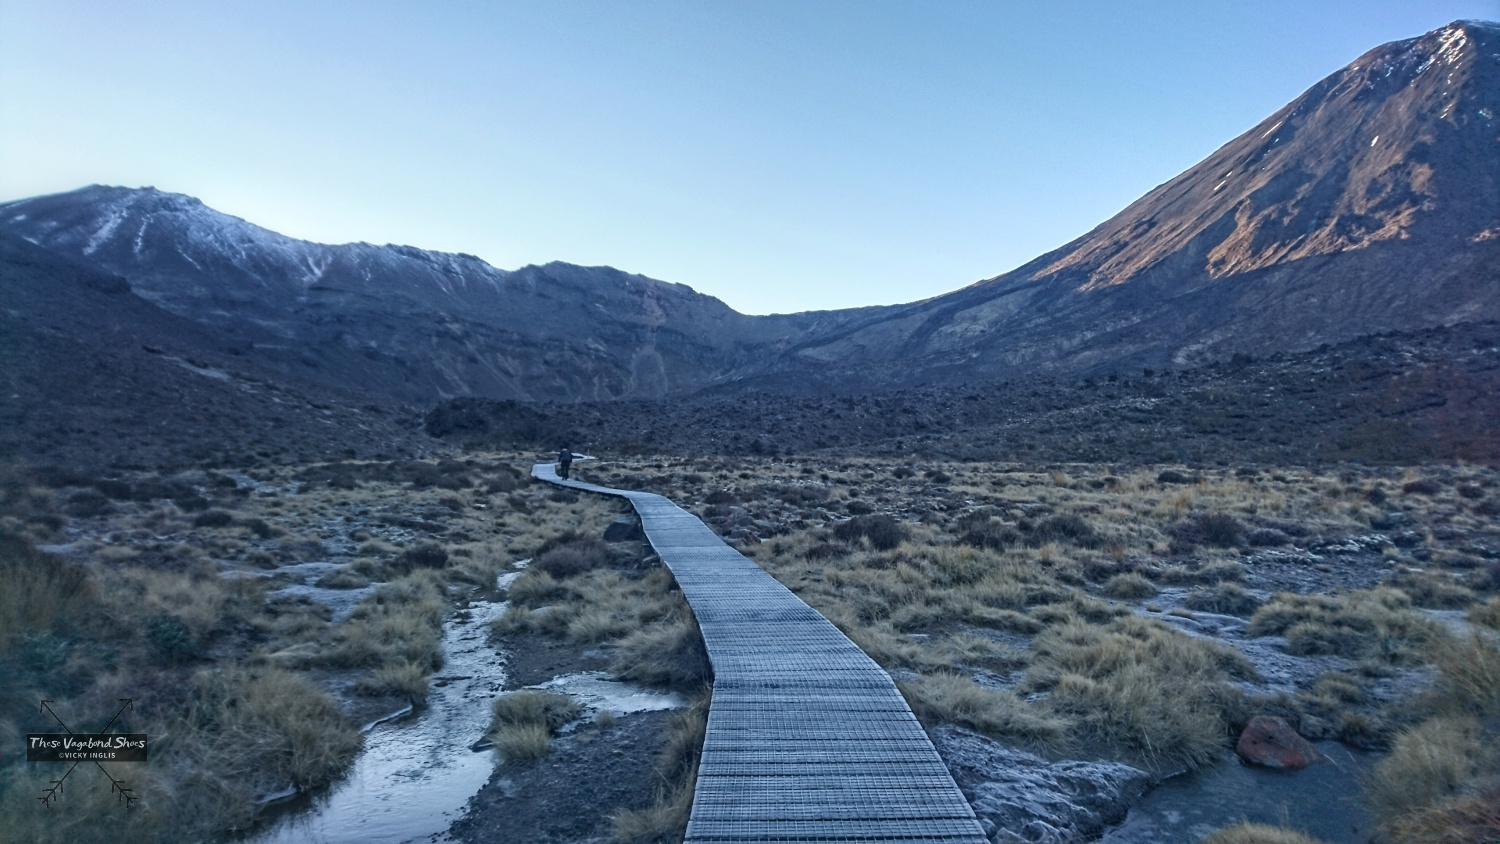
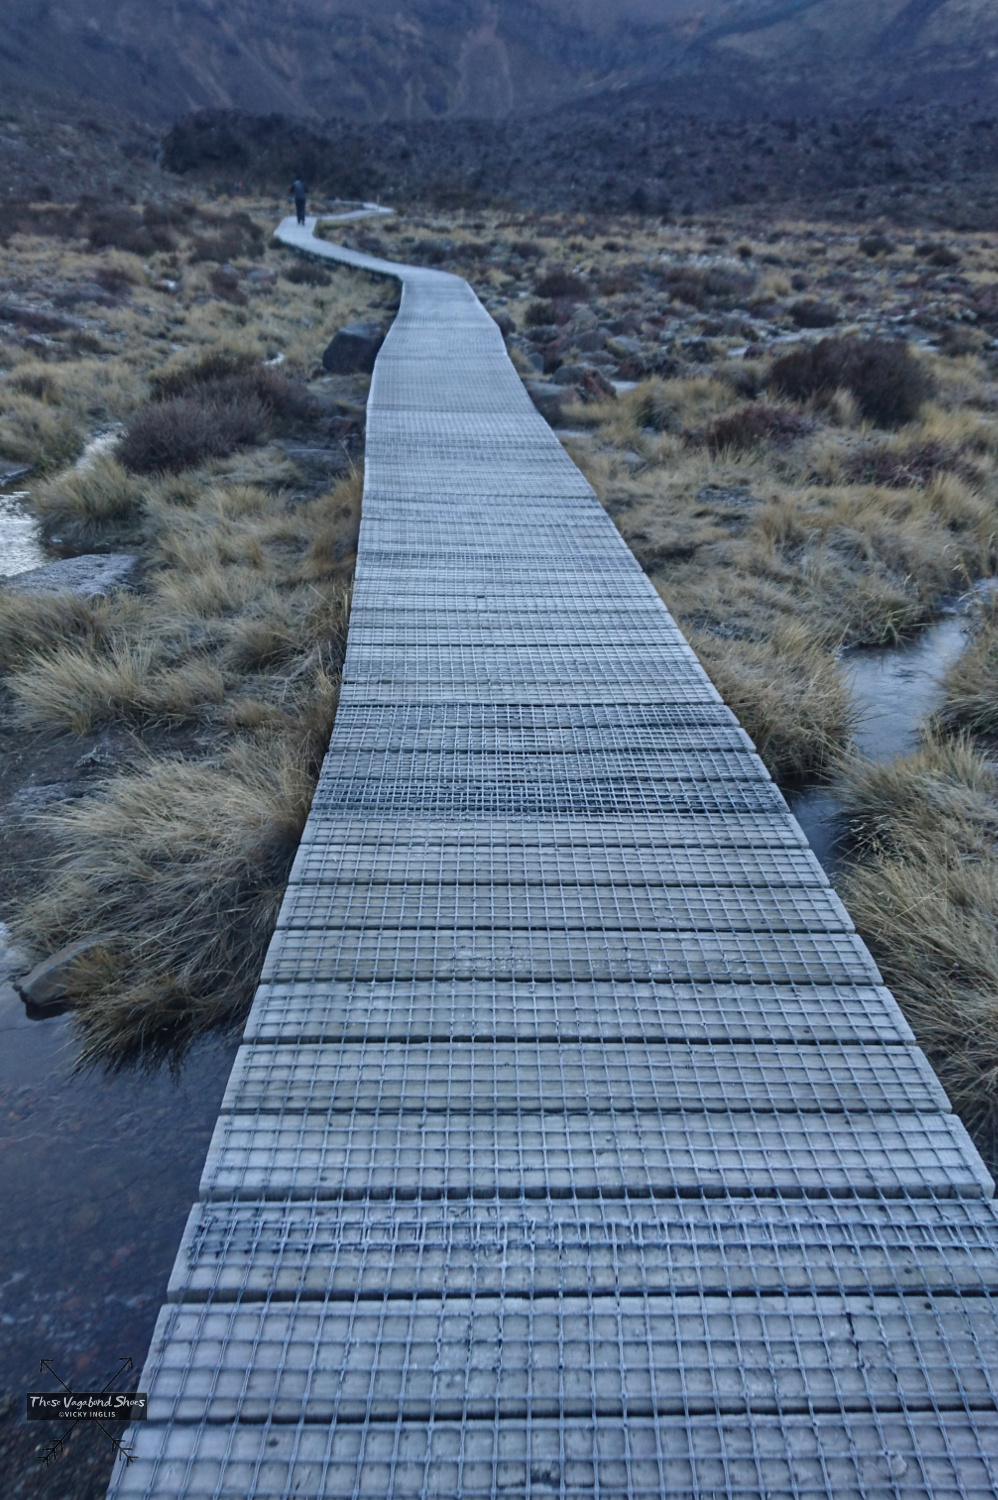
Soon the gravel track becomes a boardwalk trail, then rough rock steps, before crossing an expanse of black volcanic sand, the route scuffed out by countless other boots that passed this way before mine. Soda Springs is a short detour from the main trail, but worth the additional 10 minutes to see the waterfall (especially as it was frozen), and have a bit of breakfast before continuing on.
Soda Springs to South Crater (approx. 1 hour)
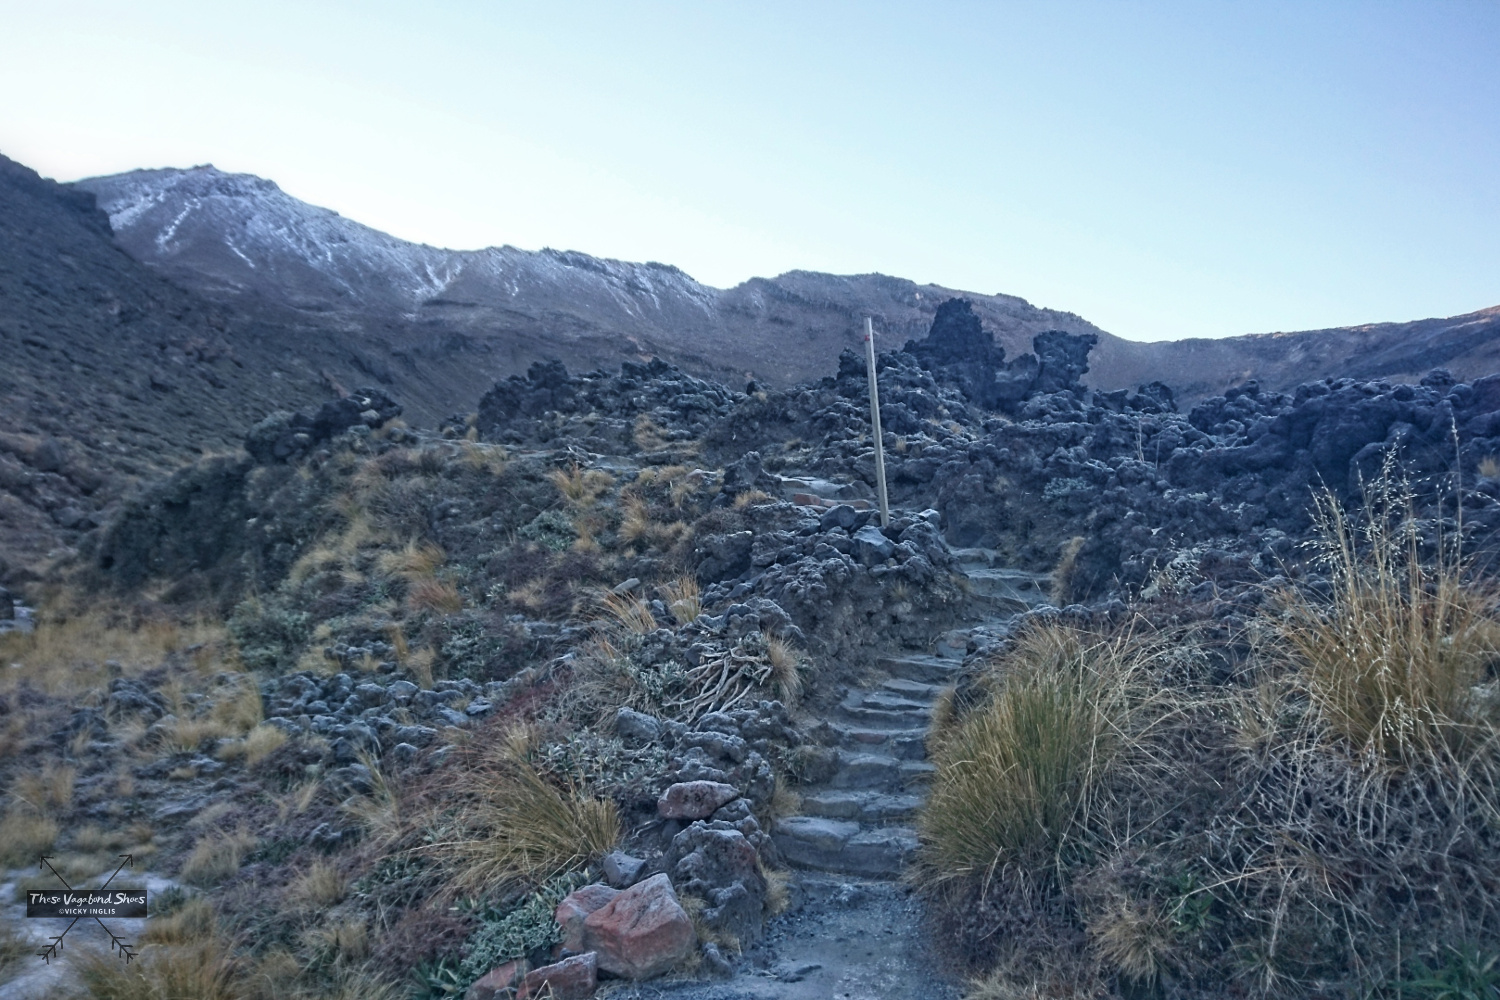
From Soda Springs, the ascent to the South Crater is known as Devil’s Staircase, rising 200m in just a short distance, and with a name like that you know it’s not going to be a walk in the park. At this point, you’ll encounter the first of several signs asking if you’re really sure you want to continue.
The Devil’s Staircase was the section that separated the fit from the not-so-fit, and is a good point to make the decision whether to continue onward or return to Mangatepopo. Be completely honest with yourself. Was your early start just a bit early for you? Has the first section of the trek been too taxing already? Are you carrying an injury or getting over illness? Is the weather looking a bit dreich or are underfoot conditions icy ahead? In all seriousness, if things don’t feel right, please do turn around. There’s no shame in making the best decision for your safety, and an emergency helicopter evacuation will certainly make a mark on your day.
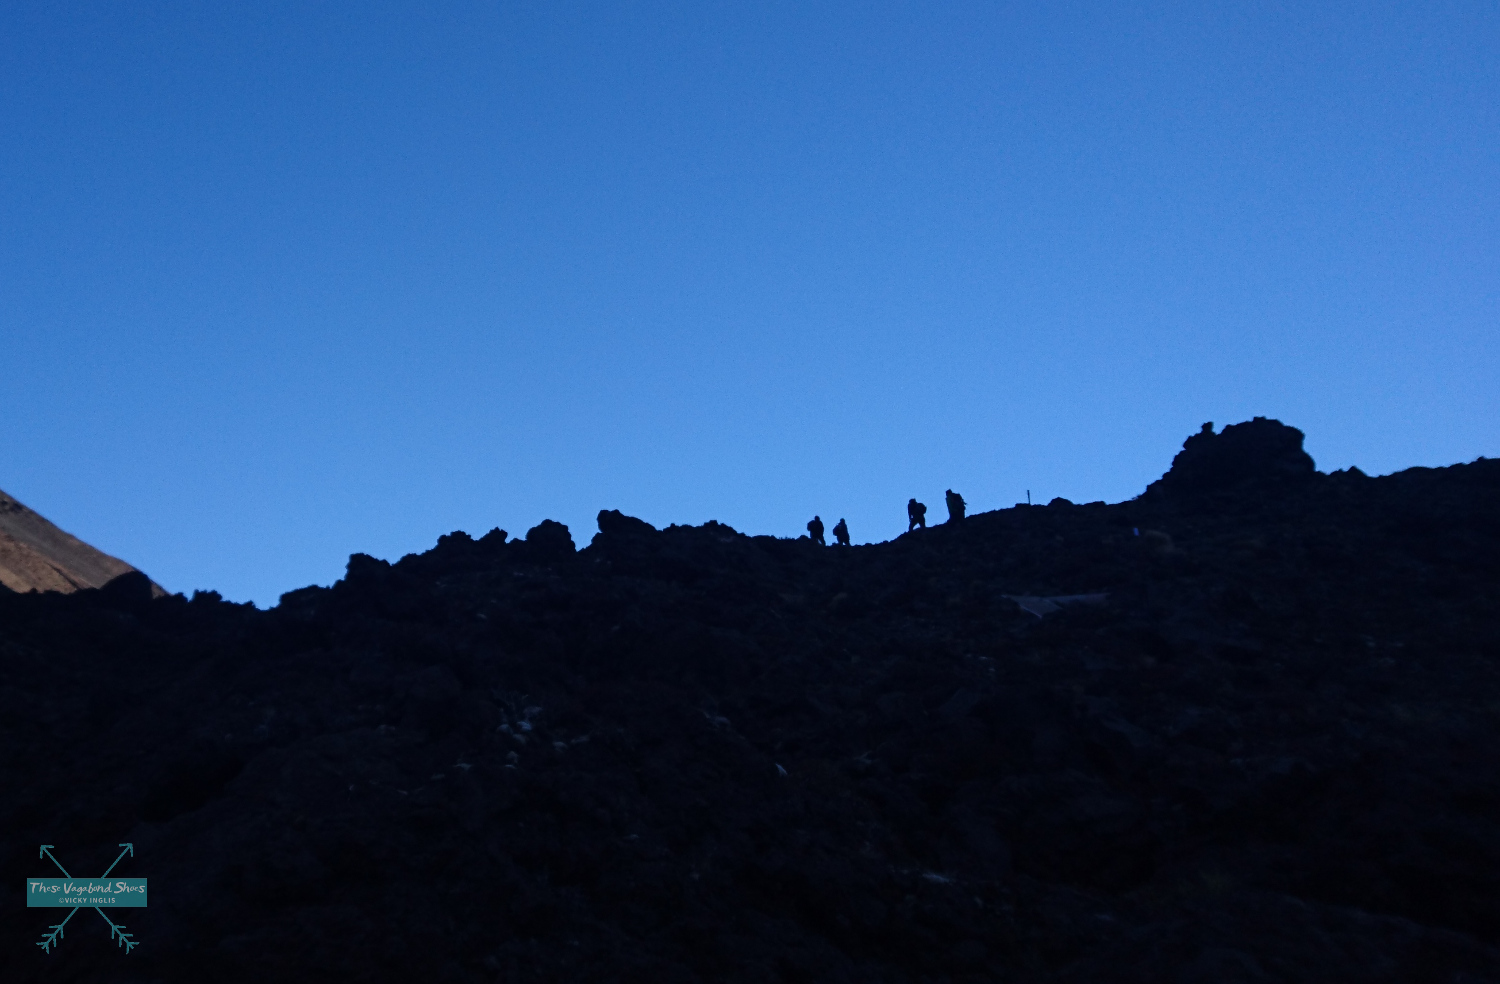
The top of the Devil’s Staircase is where trampers can take a side track to Ngāuruhoe, immediately recognisable to LOTR fans as Mount Doom. The ascent would be a challenging scramble up a steep slope covered with loose scoria gravel, from which all trail markings have been removed. The local iwi ask that hikers do not climb the mountain, but if you choose to do so against advice, be aware it will add at least an additional one and a half to two hours to the total time for the hike.
South Crater to Red Crater (approx. 1 hour)
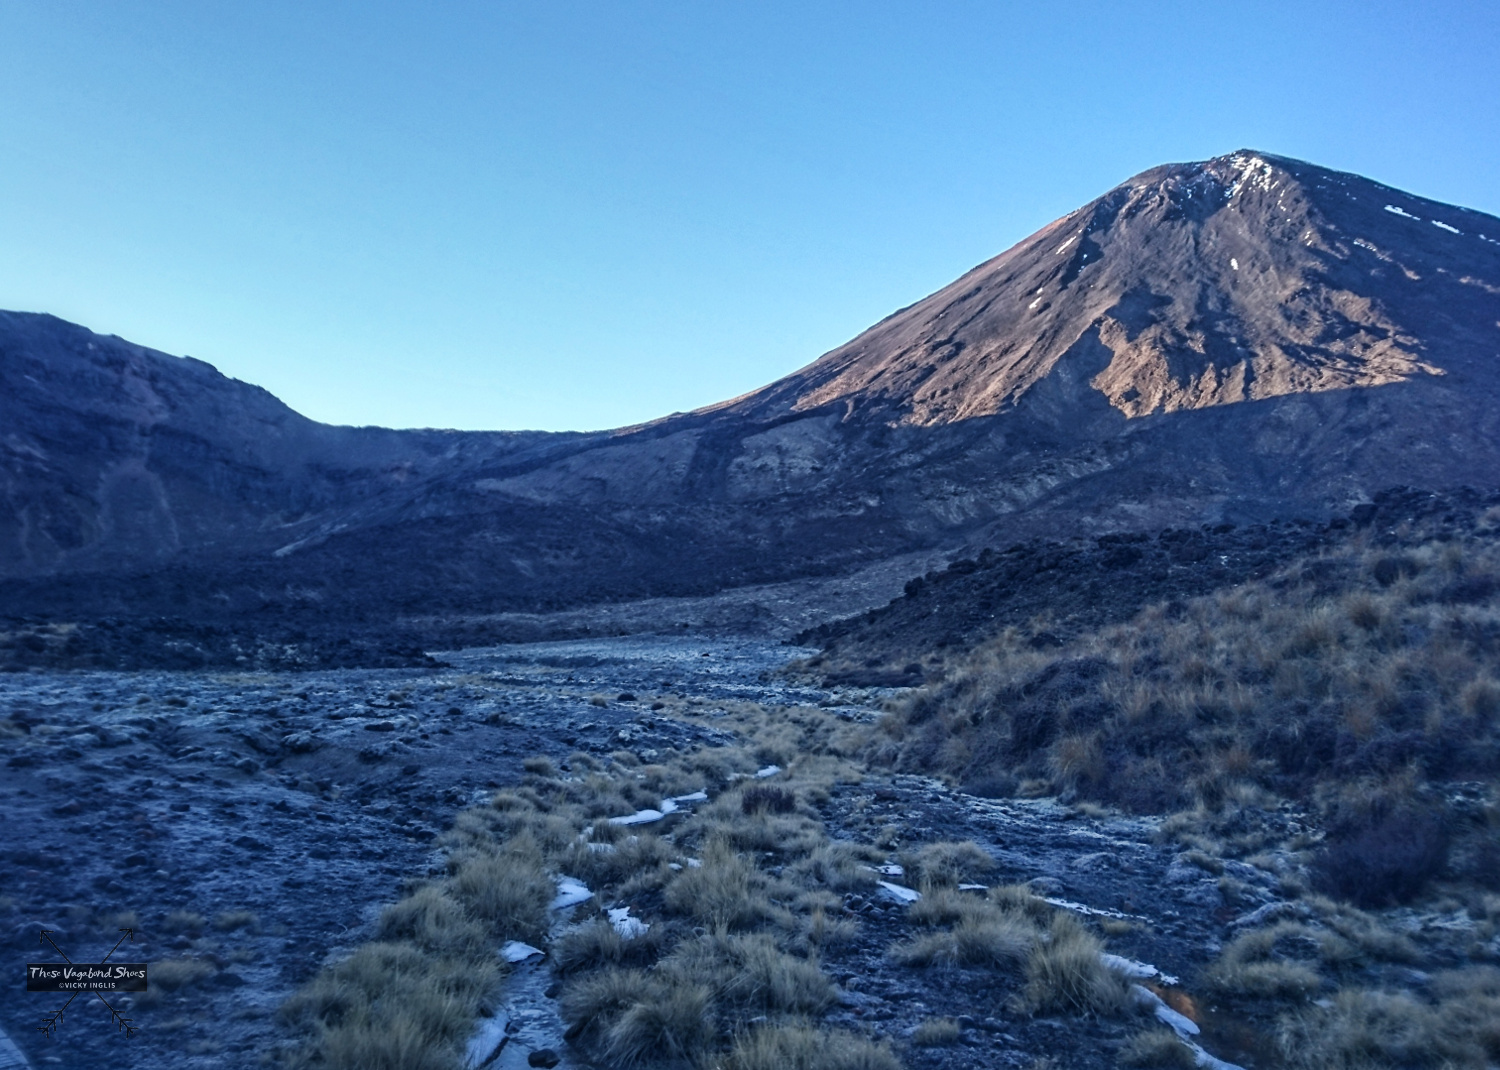
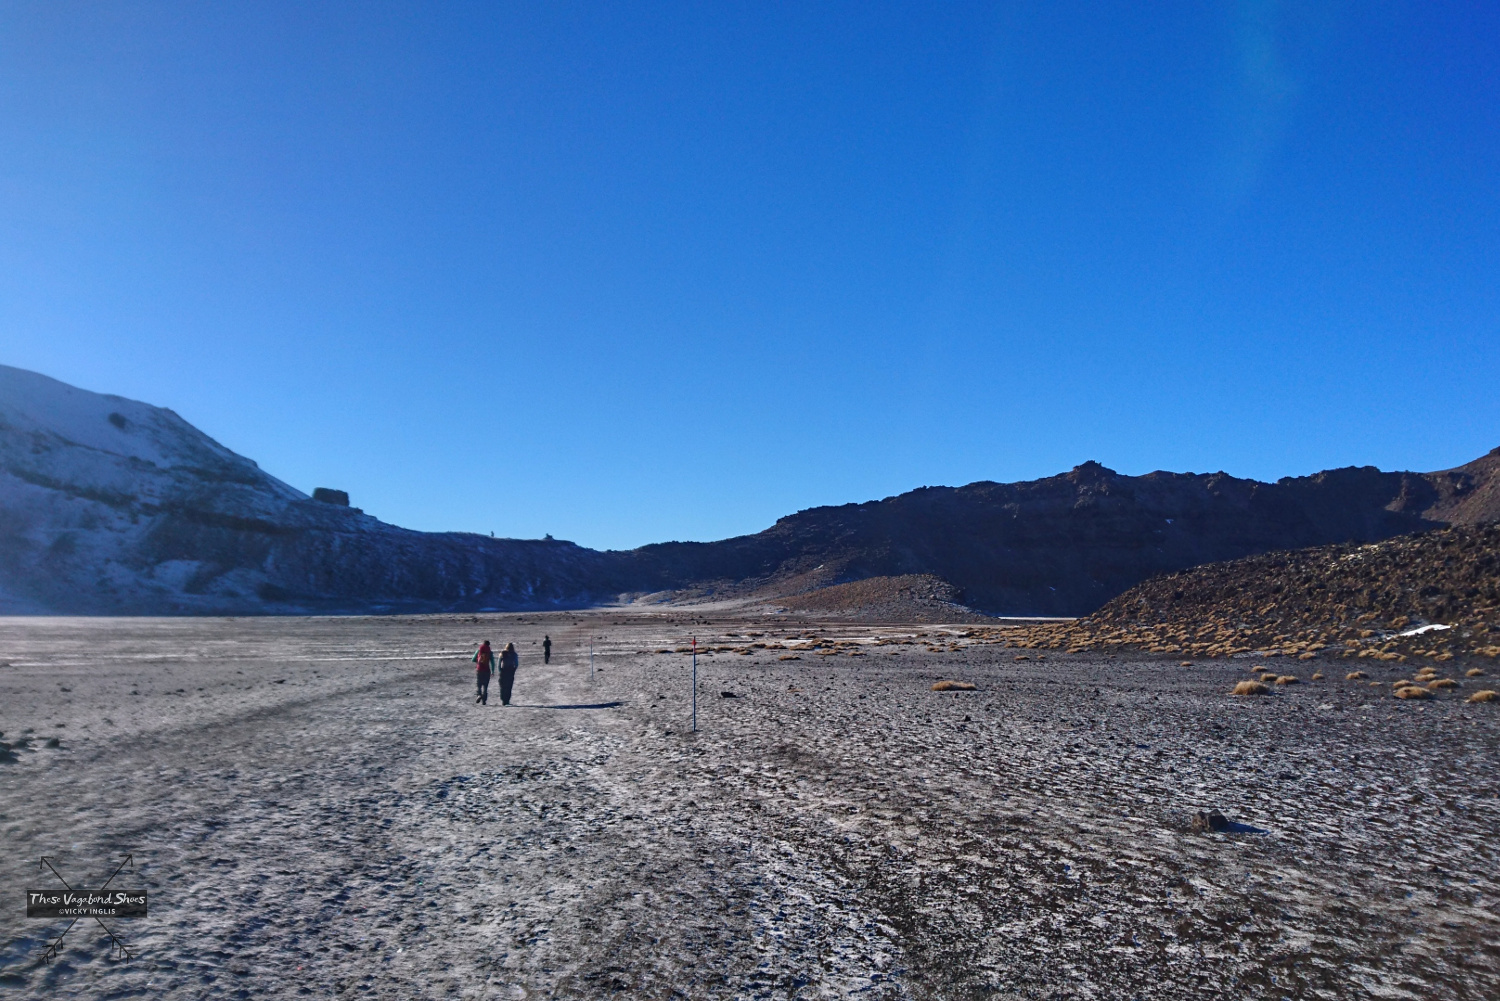
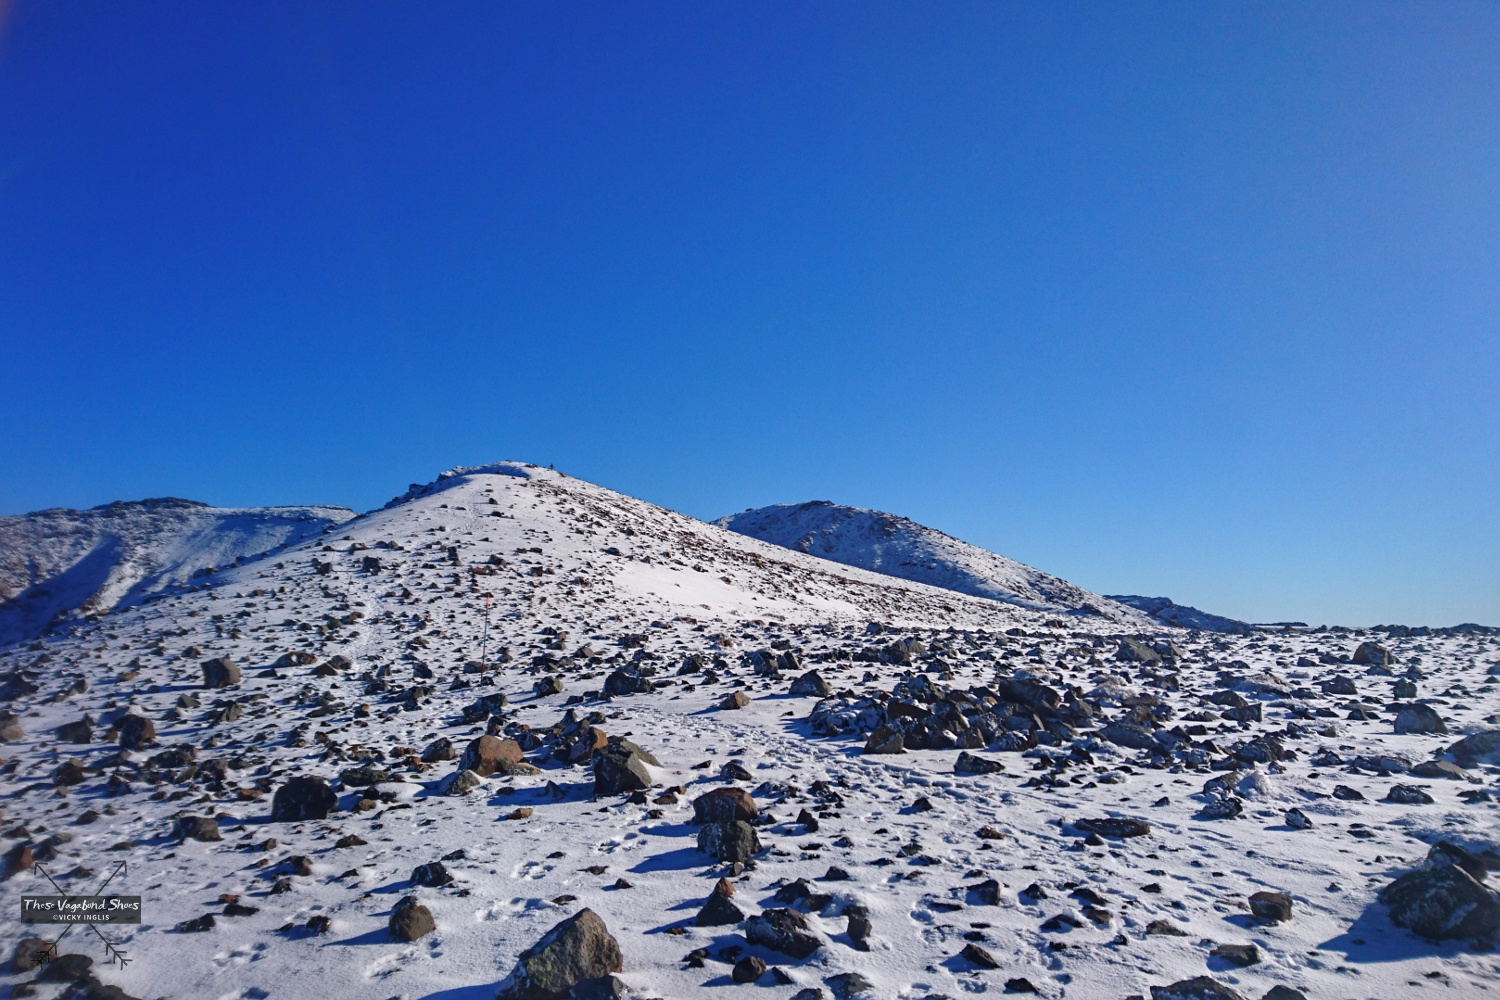
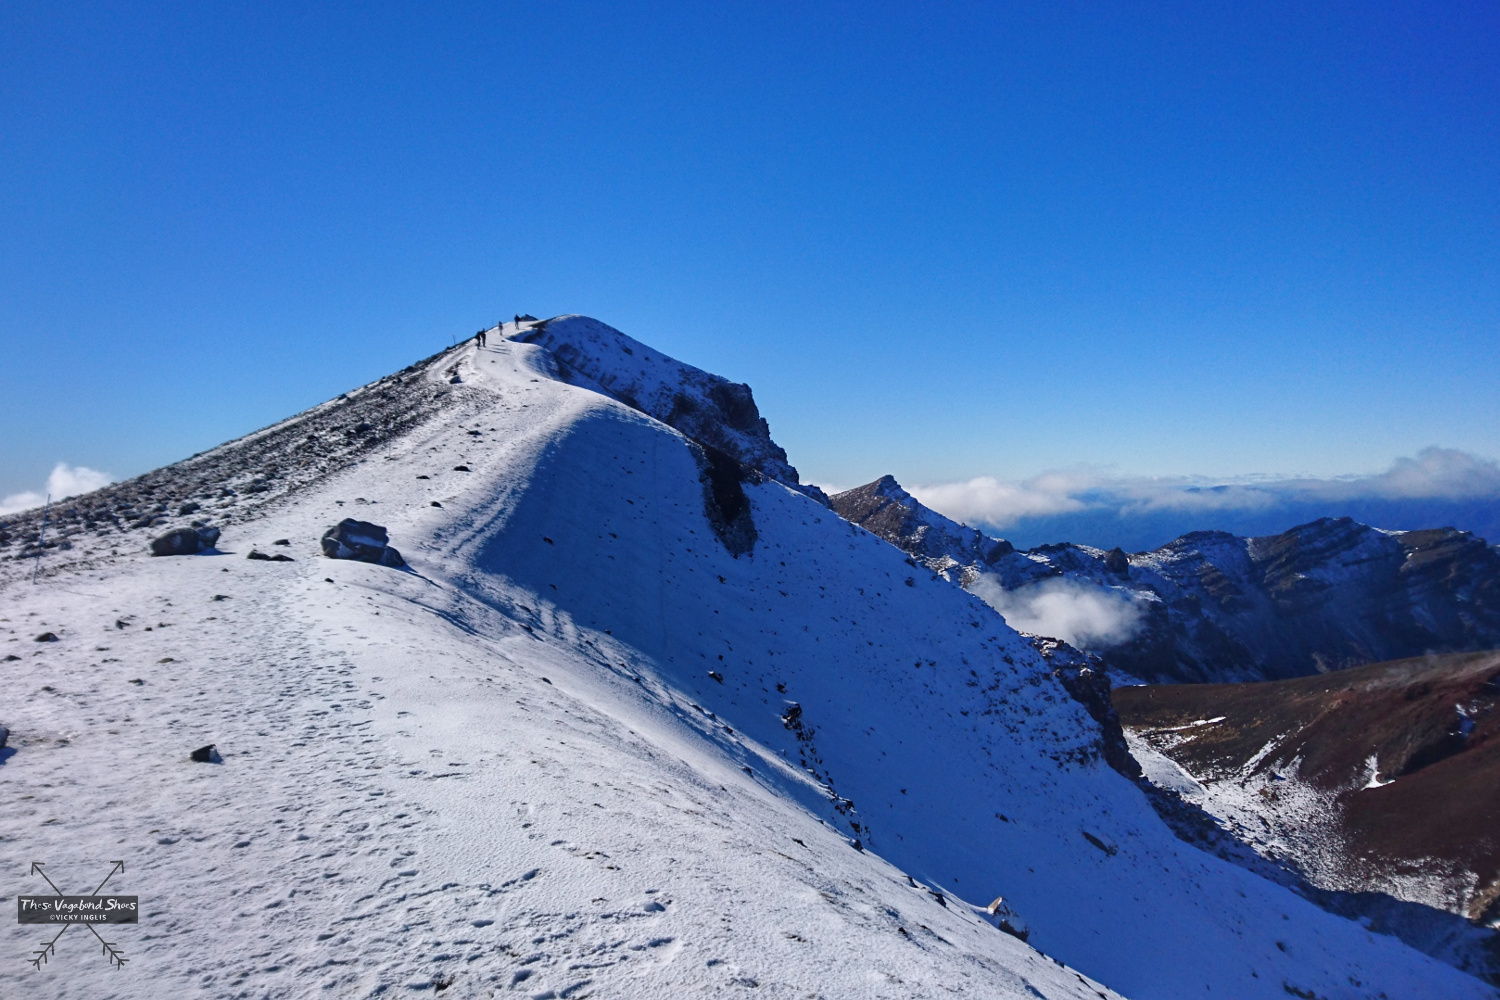
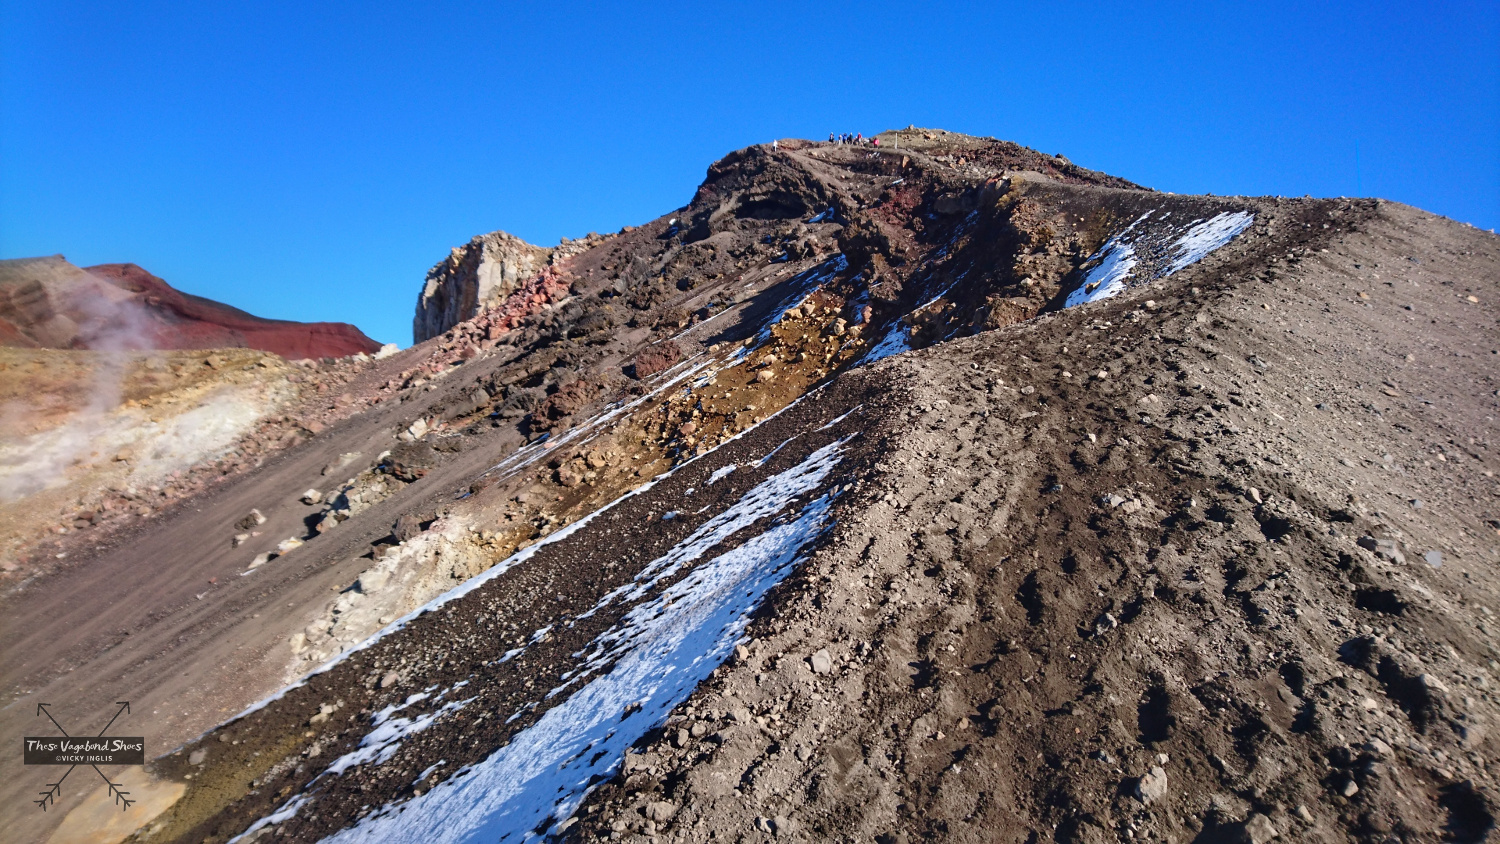
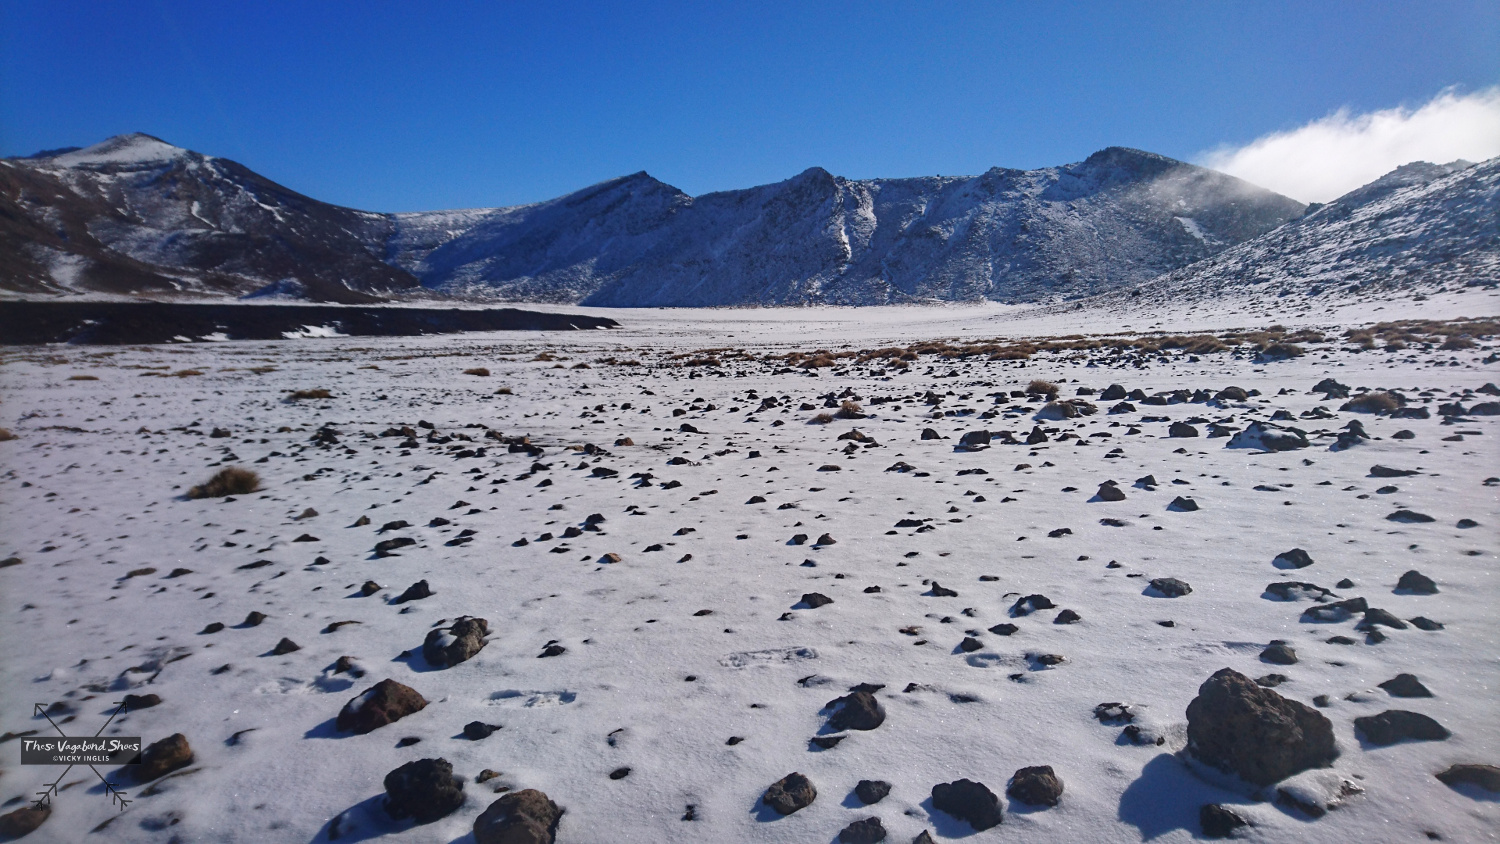
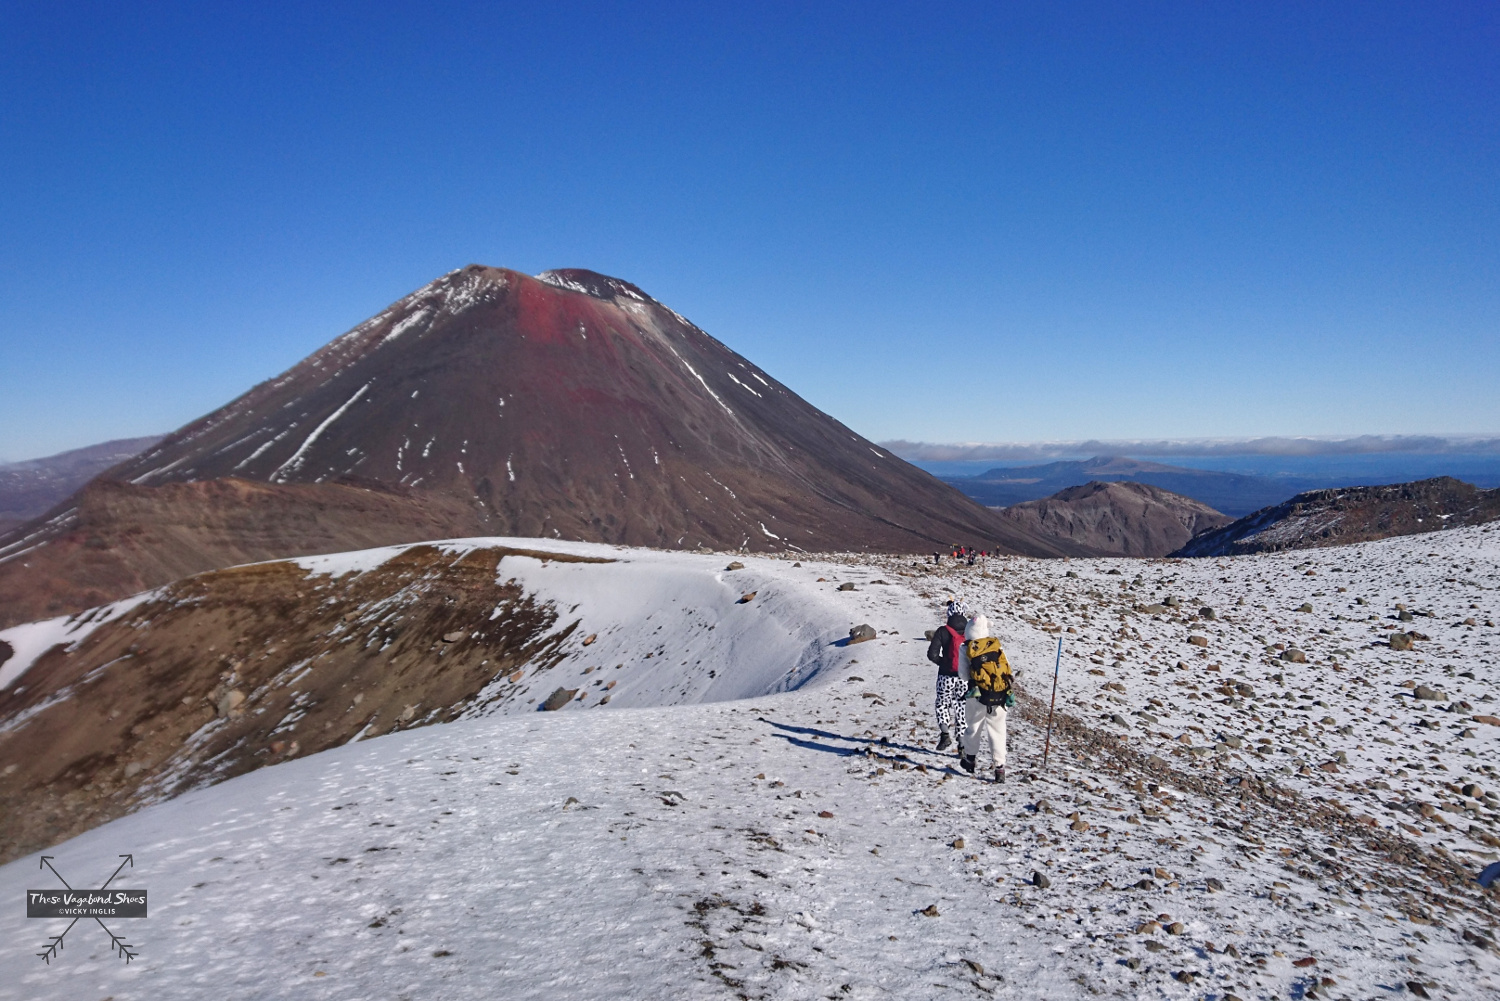
On reaching South Crater, I emerged back into the sunlight after being in the shade of the mountain for the first couple of hours of the ascent. Here, the trail levels out again as it crosses a wide, dusty pan across the bottom of the crater, and I got my first glimpses of the Red Crater above, and the snowy top of Tongariro itself.
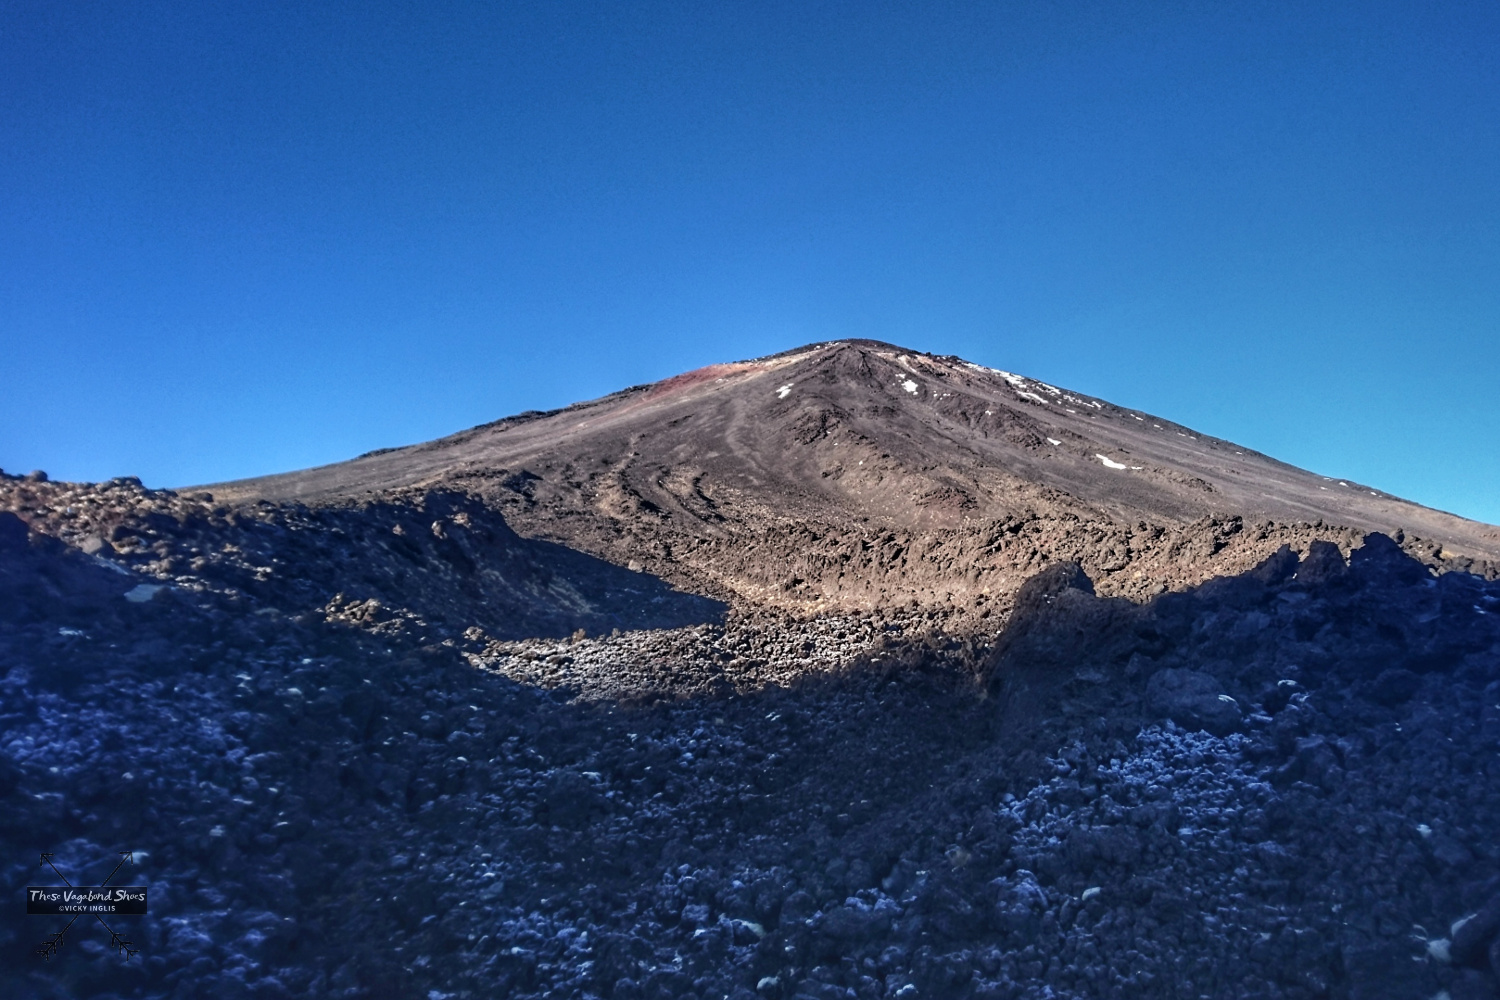
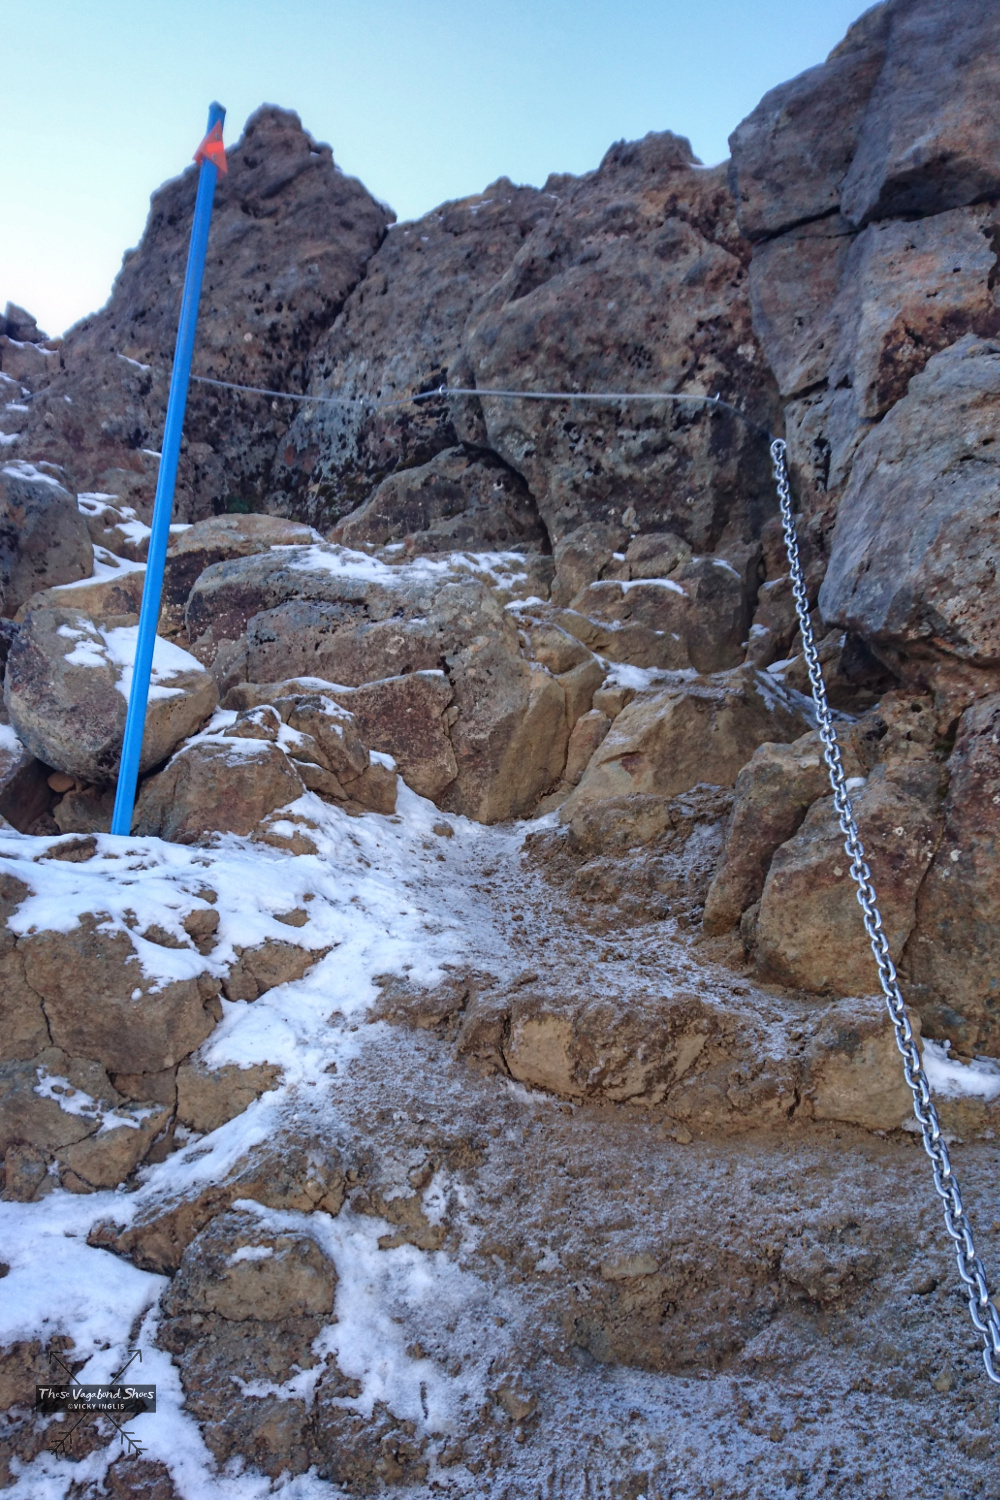
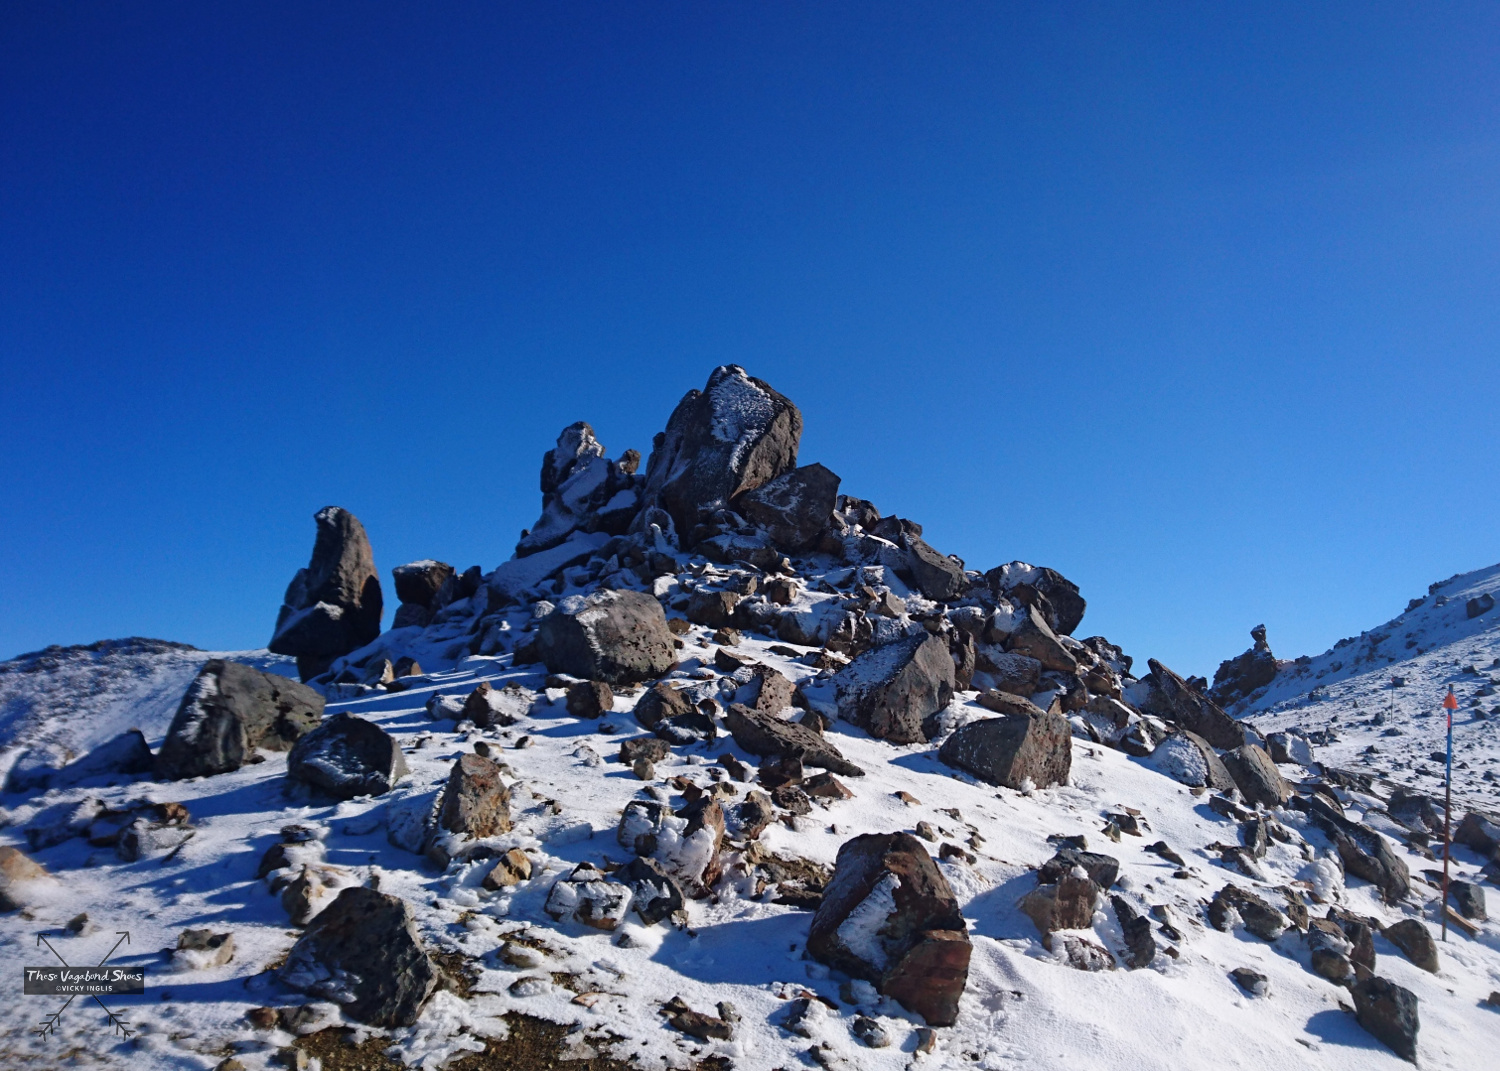
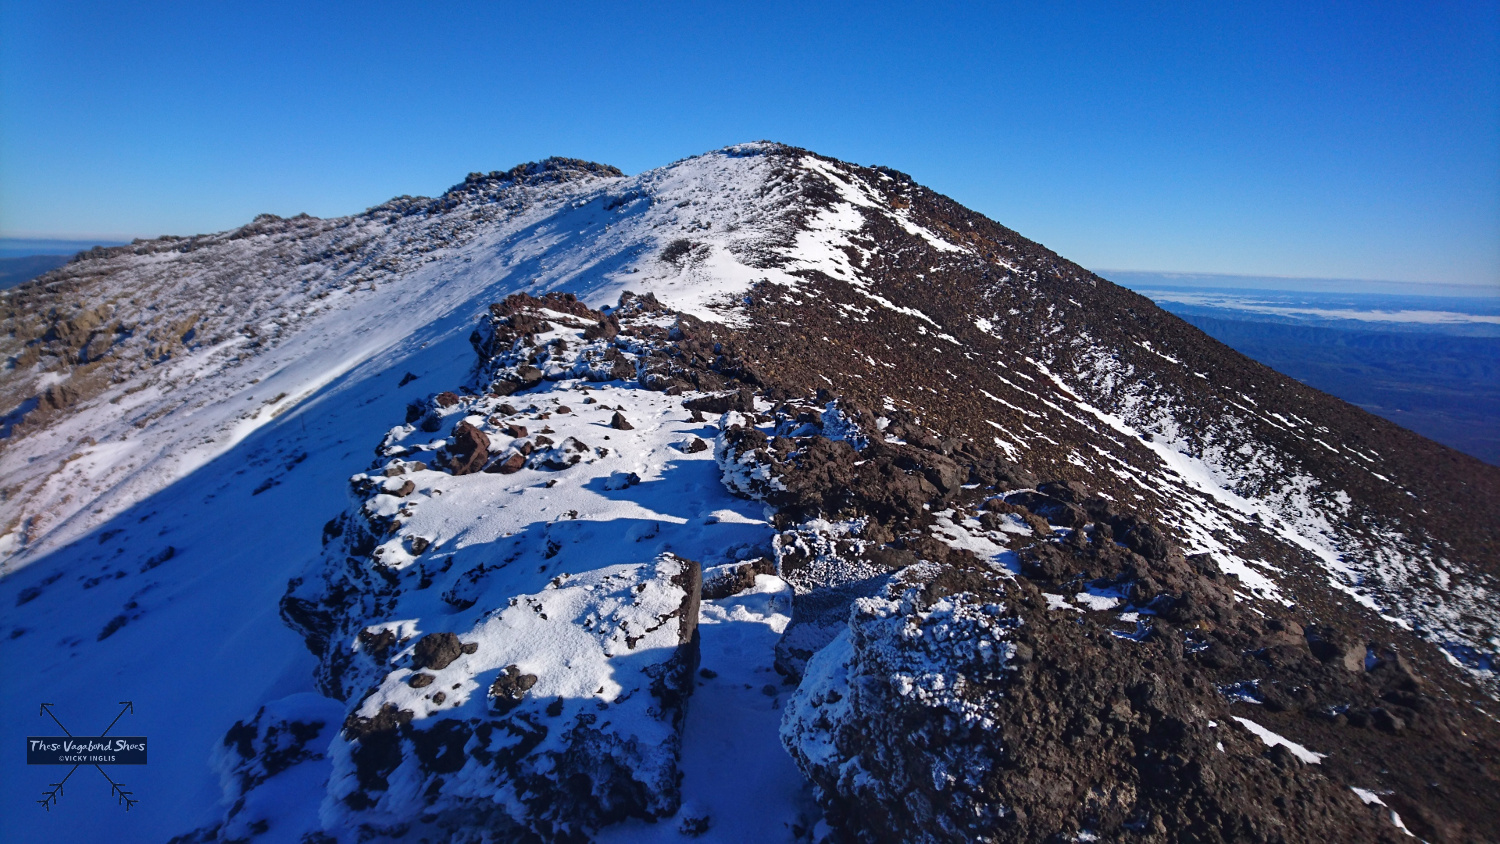
The trail then ascends an exposed rocky ridge to Red Crater, which was yet to catch the sun and glazed with a fine coat of verglas in places from the frosty overnight conditions. Chains bolted to the rock help you over the steepest parts.
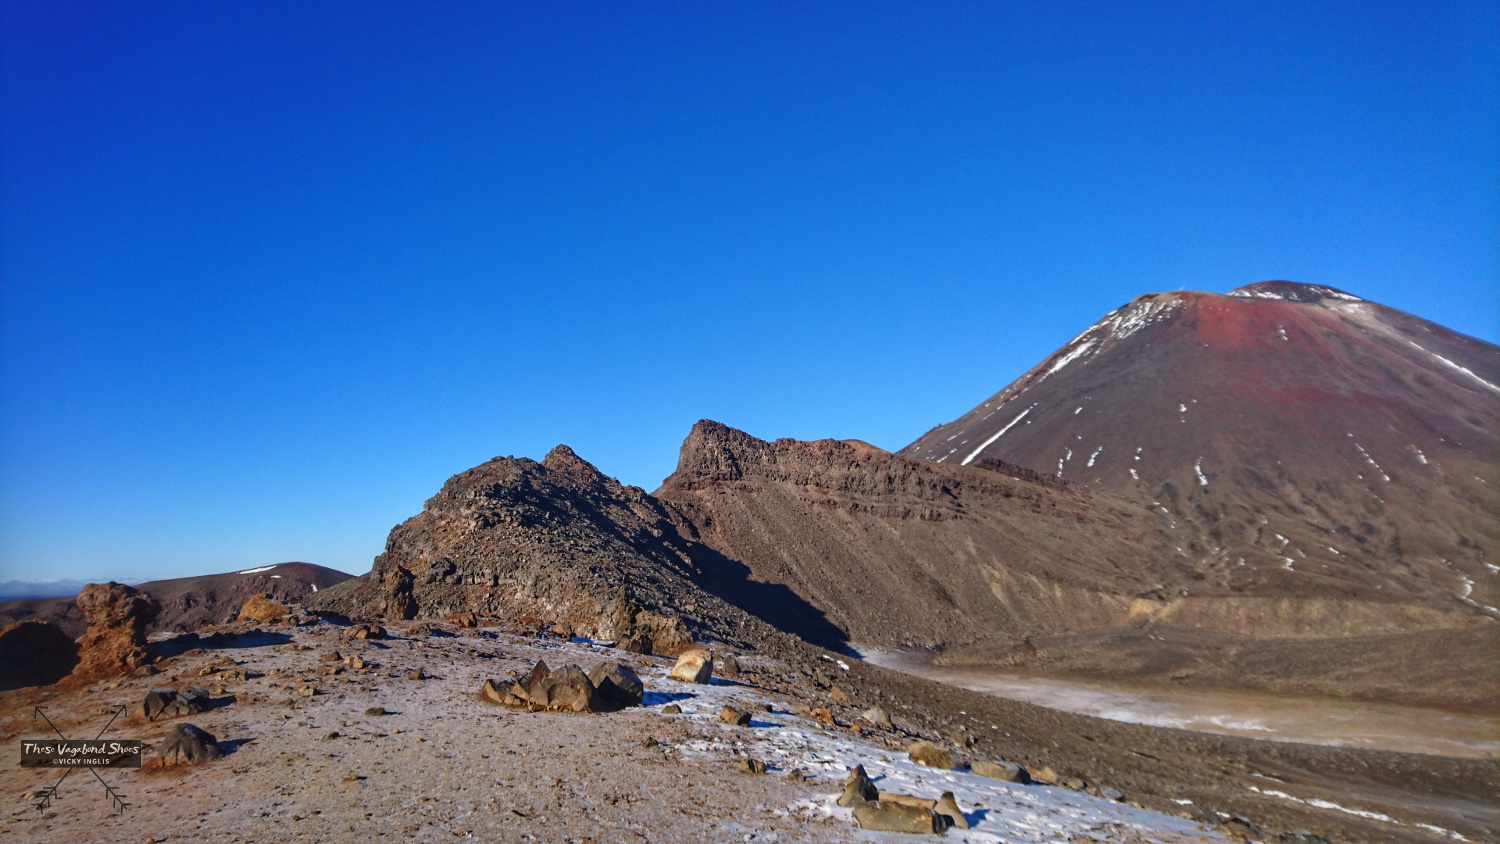
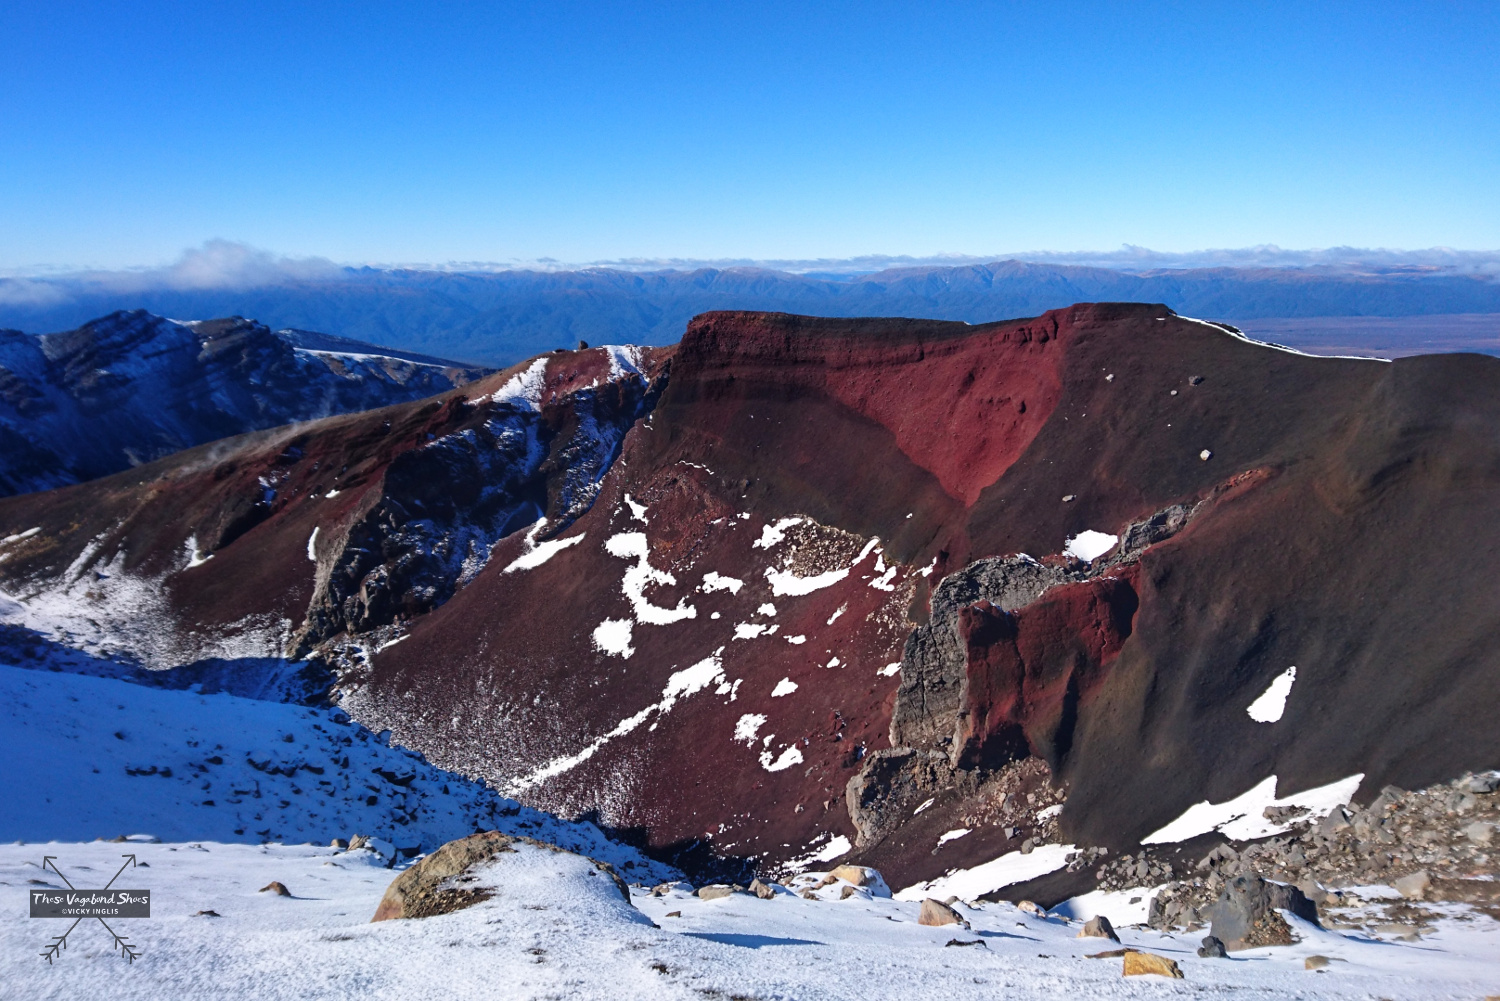
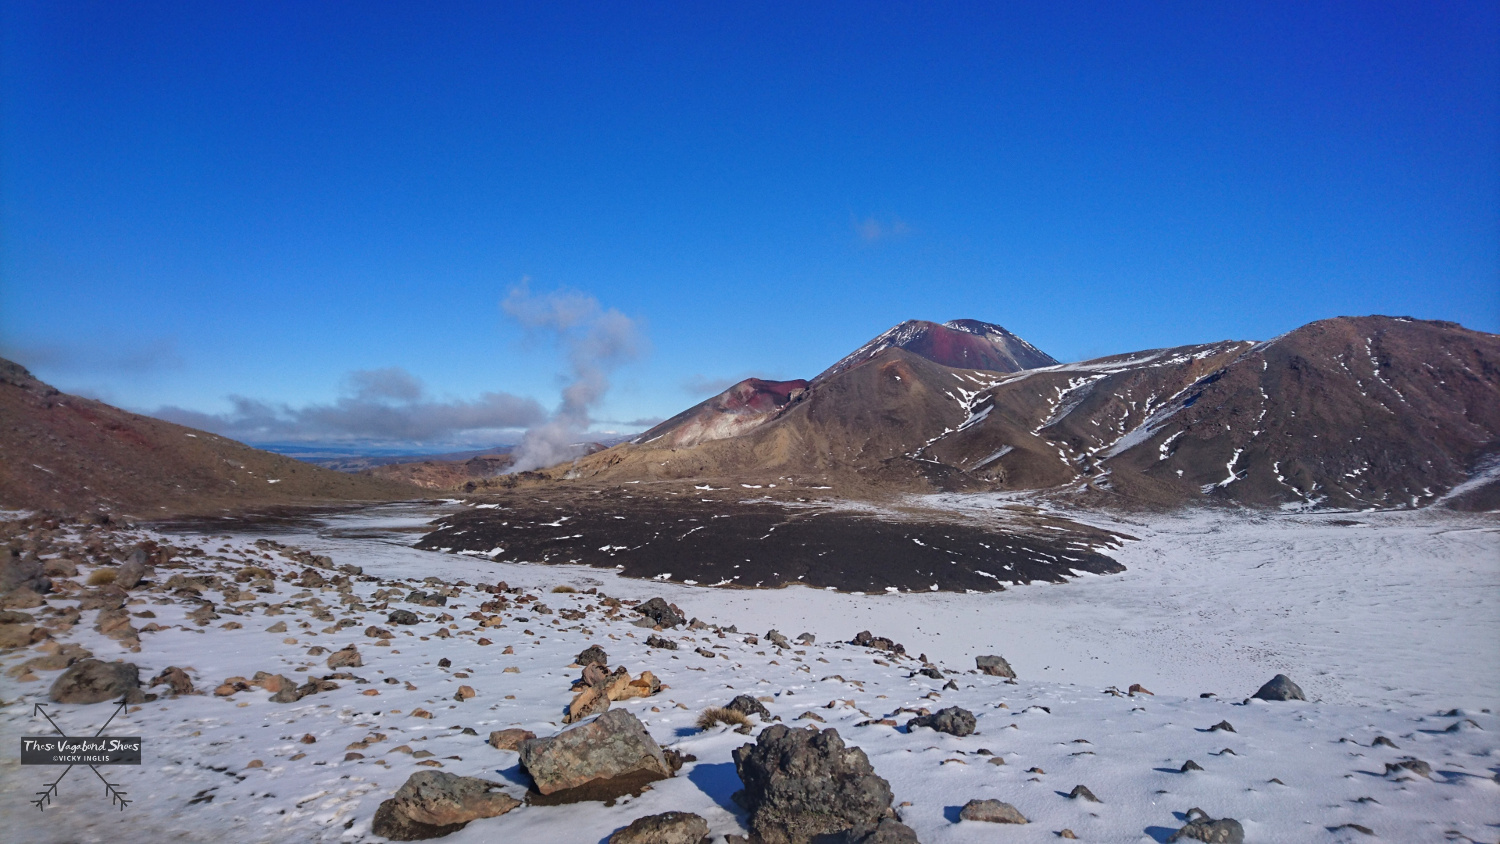
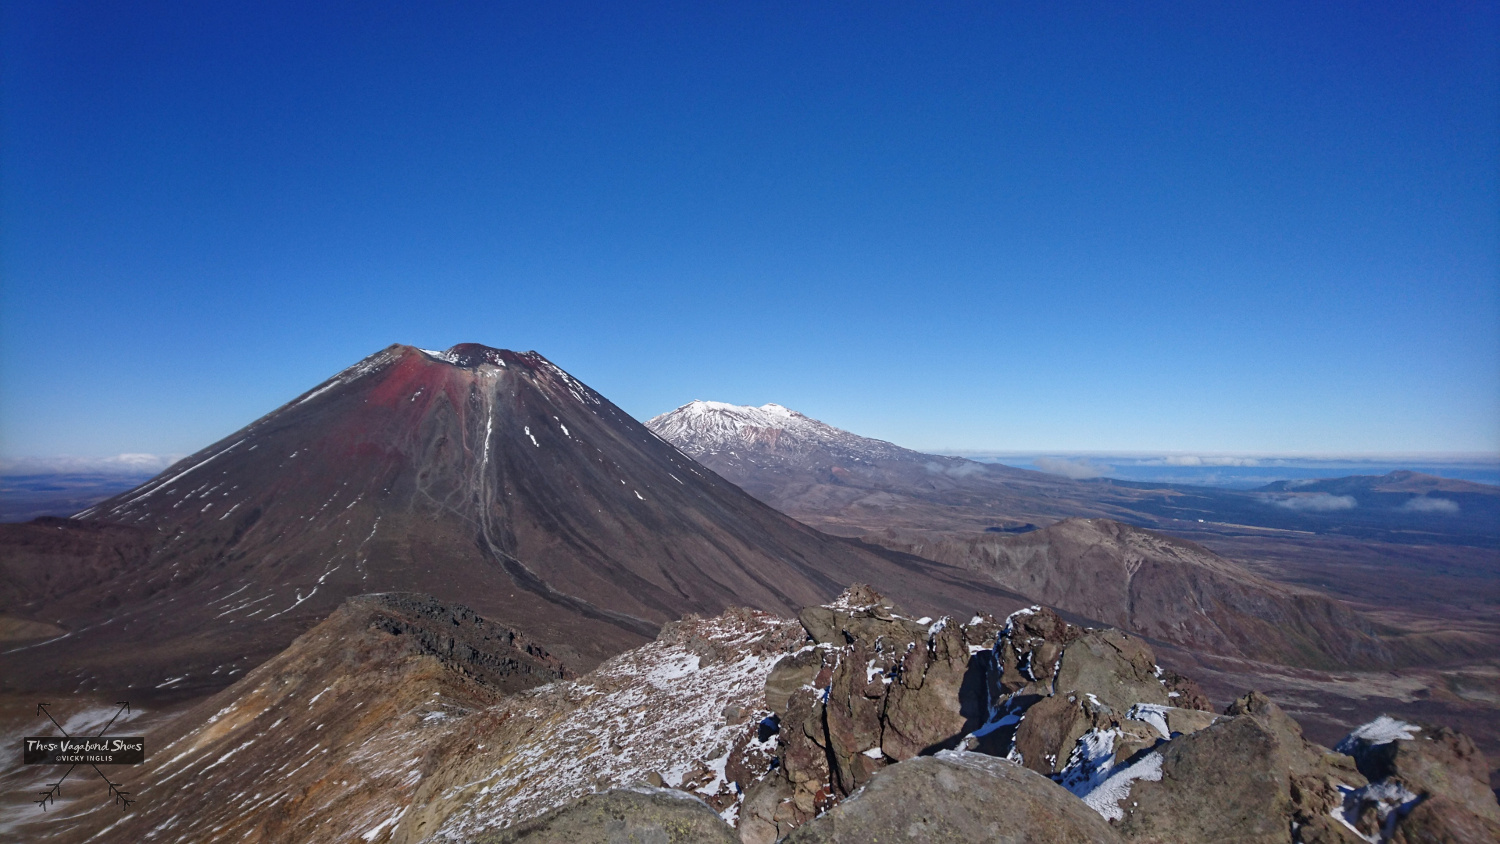
At 1,886m (6,188′), the Red Crater is the highest point on the Tongariro Alpine Crossing, and is the real highlight of the route. The crater itself is a deep blood red from oxidised iron in the volcanic rock, and the height gives the most spectacular views of the Emerald Lakes, across to the Blue Lake, and down the Oturere Valley to the Rangipo Desert, the location that doubles for Mordor in the Lord of the Rings films.
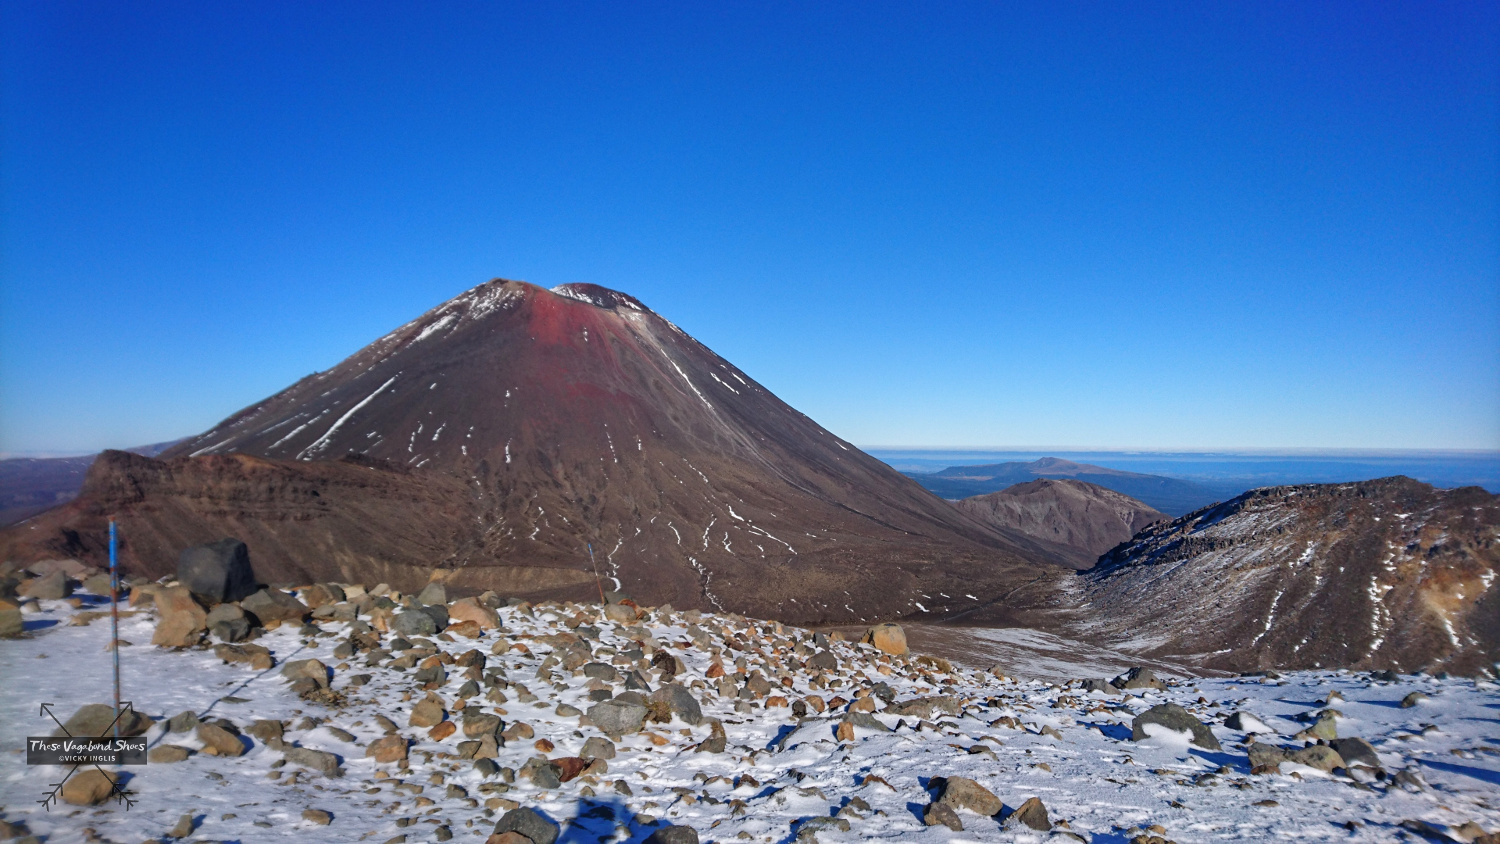
Just before the Red Crater a side track follows an exposed ridgeline that leads to the summit of Tongariro (1,976m / 6,482′), adding an additional hour to two hours to the crossing time but providing spellbinding views across the craters of Tongariro, to Ngaurahoe, and the volcanic massif of Mount Ruahepu beyond. On a clear day, it’s possible to glimpse the symmetrical cone of Taranaki far off to the west.
Through the Central Crater (approx. 45 mins)
The descent from the Red Crater is the most challenging section of the route, down a steep slope is covered in loose scoria scree and volcanic sand. It’s here that you’ll appreciate wearing boots over shoes, as sharp sand will find a way into your footwear and feel very uncomfortable.
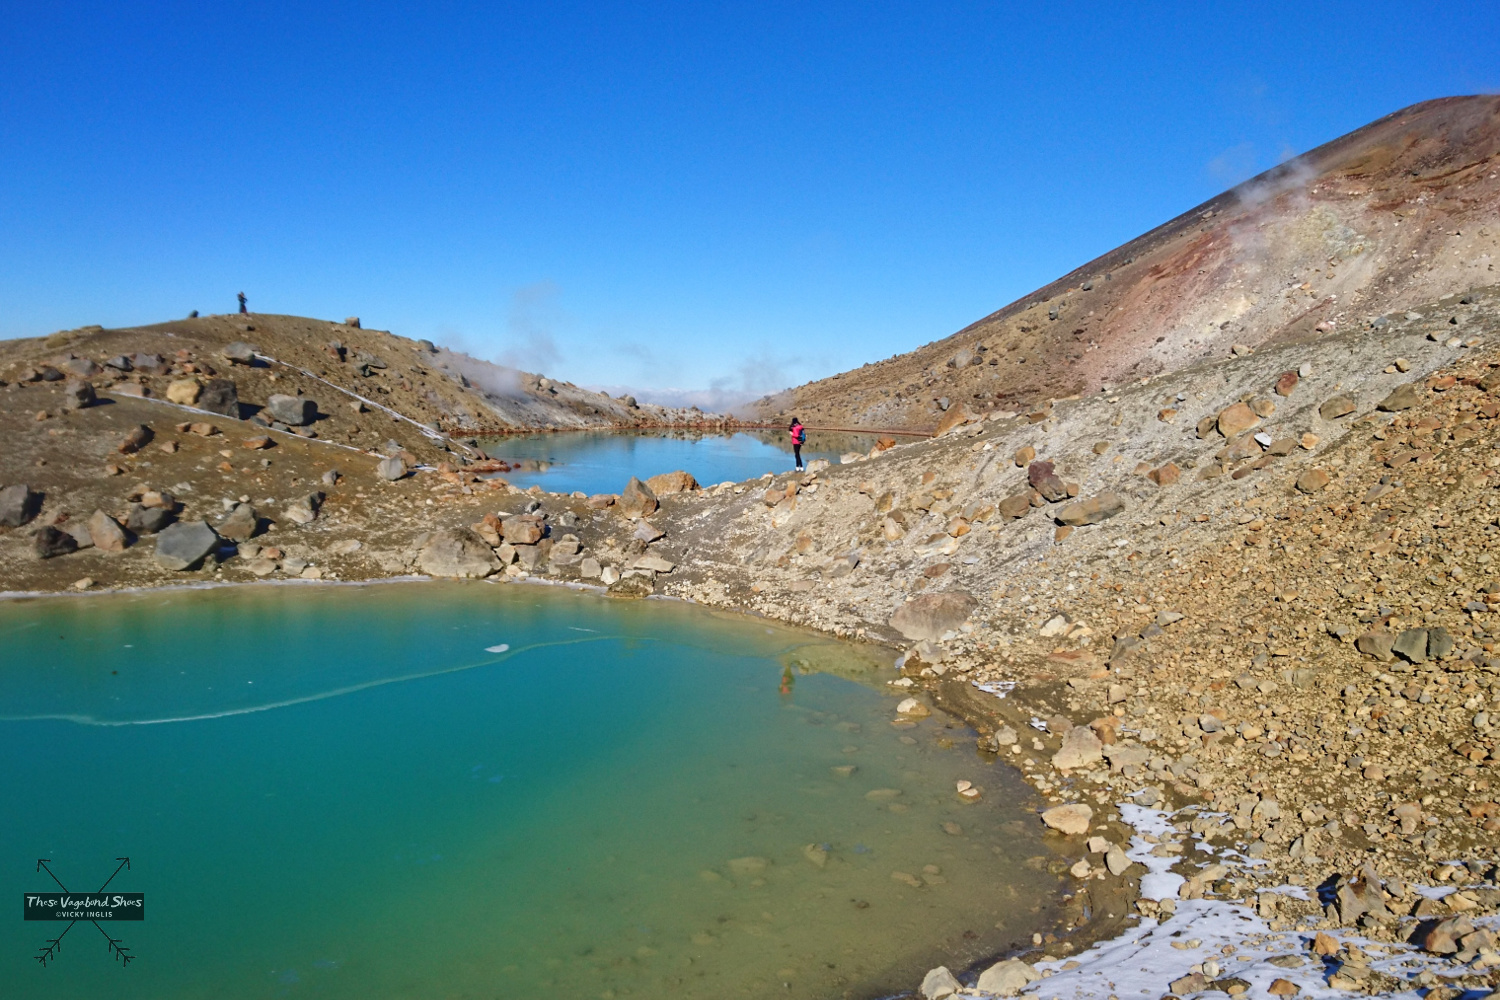
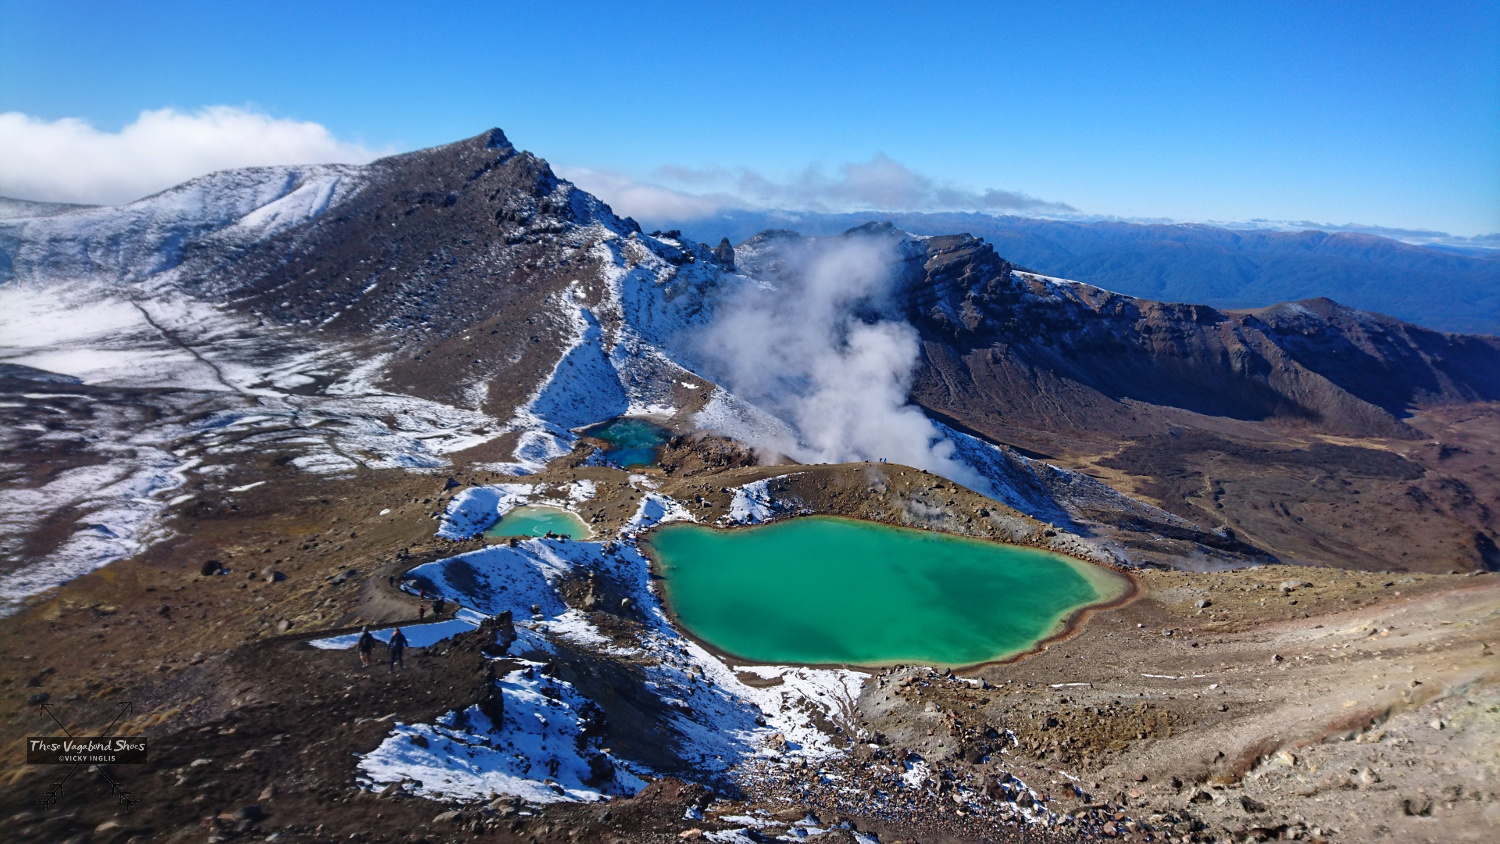
As I slithered my way down the slope towards the Emerald Lakes, curls of sulphurous steam rose up from the dark earth, and I felt the volcanic warmth through my feet. Half-way down is the spot where everyone likes to stop for the epic “I’m in a volcano” photo, but when you see the view, you’ll completely understand why.
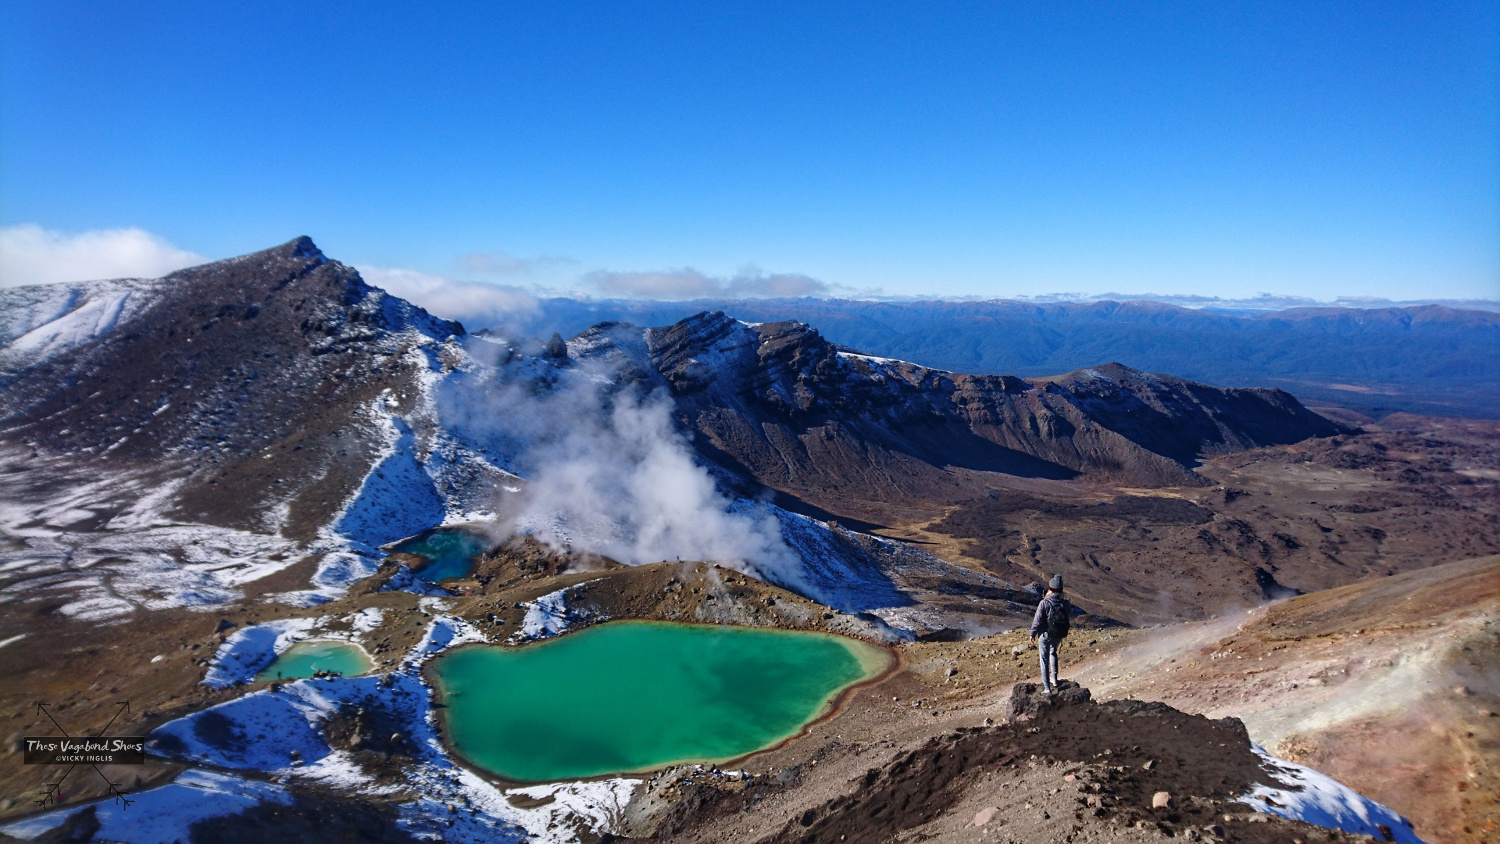
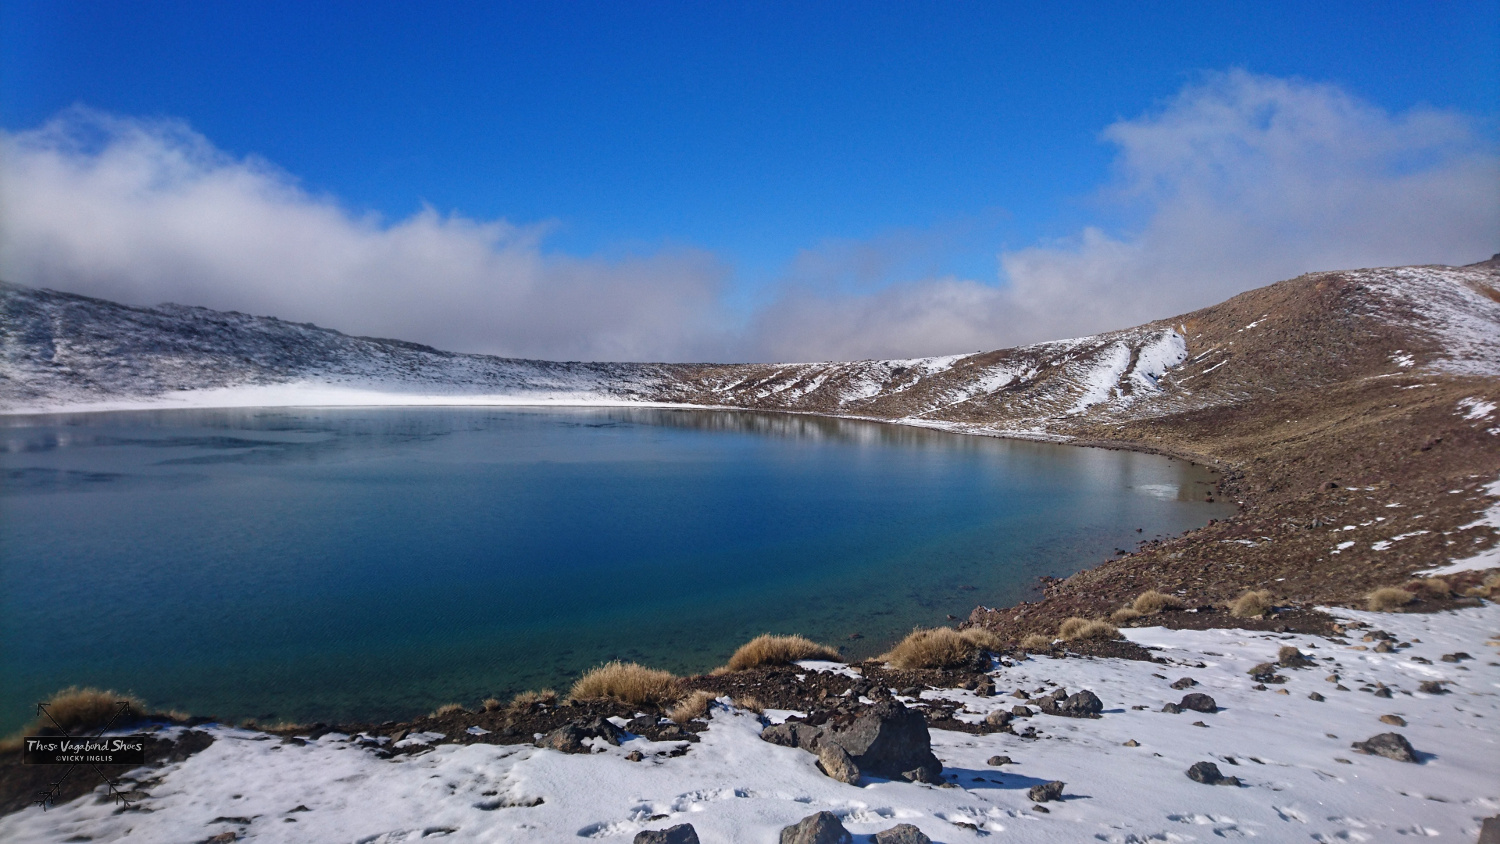
In te reo Māori the Emerald Lakes are Ngā Rotopounamu, the greenstone-hued lakes. The vivid opaque green of the water is derived from minerals leached from the thermal areas nearby, and reminiscent of the stones which have a huge significance in Māori culture. There’s a lingering smell of sulphur in the air, so while you can get close to the water to observe the colour, and walk around the lakes, you might want to continue on to the track junction to find a scenic spot for lunch.
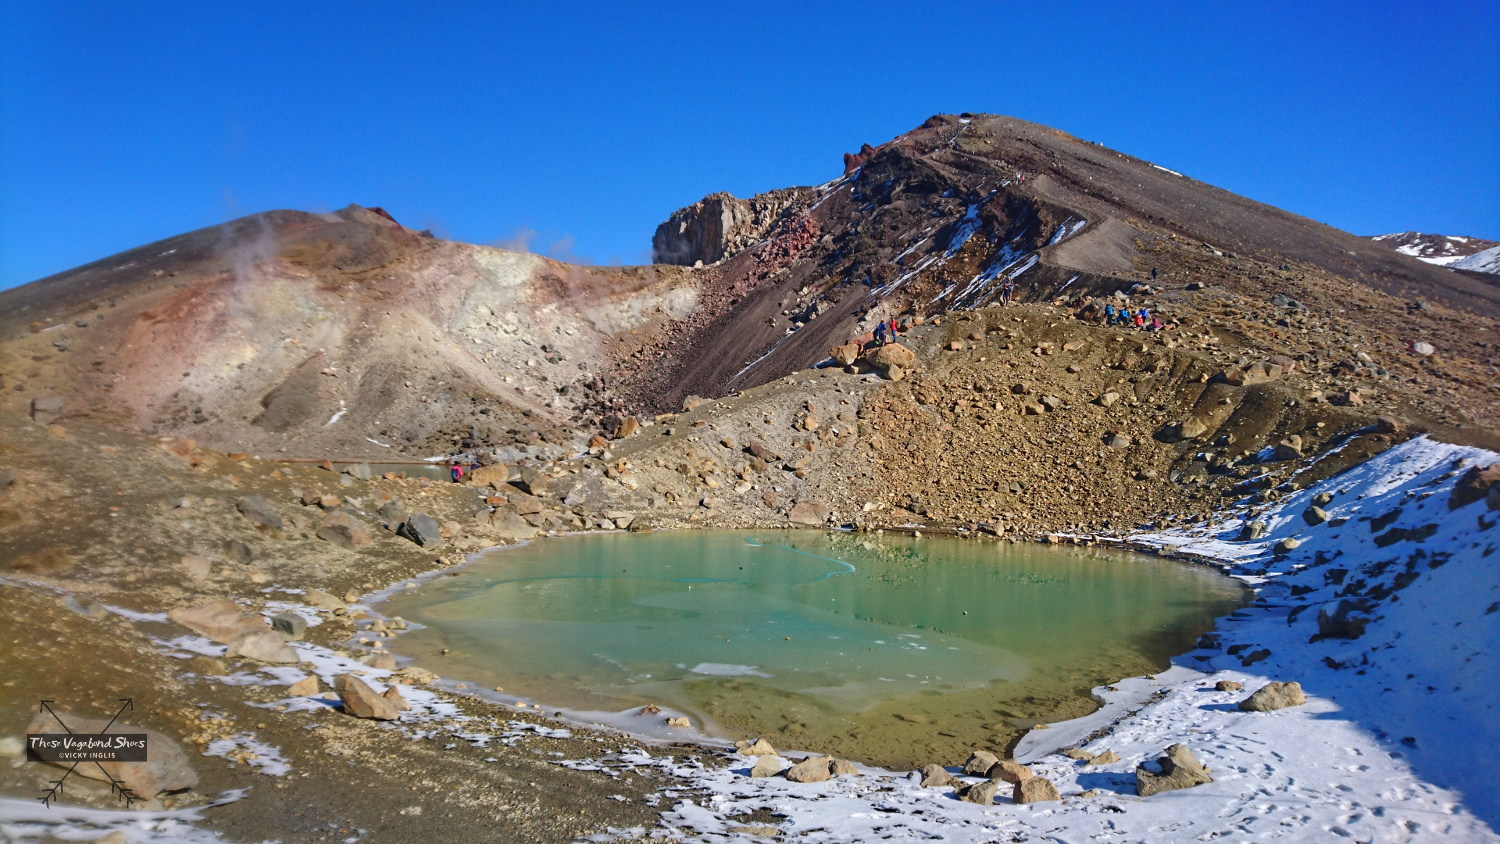
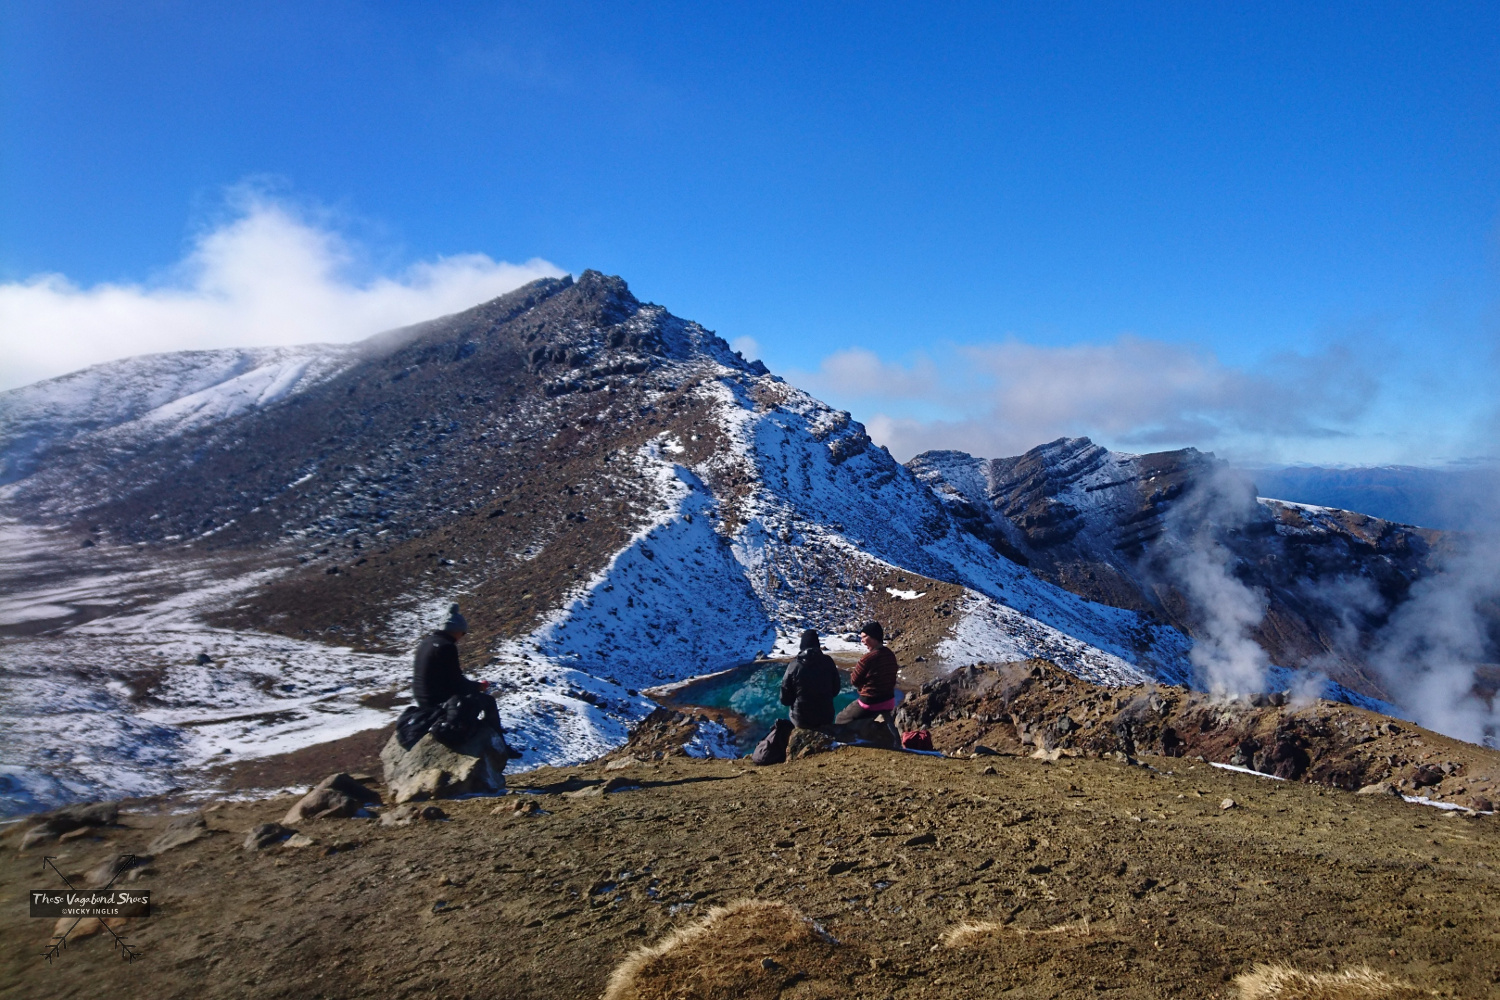
The Tongariro Northern Circuit branches off the Alpine Crossing route by the Emerald Lakes, heading down to the Oturere Hut, while the main route continues on to the Blue Lake. The flat pan of the crater was covered in a layer of snow, and the lake still held a little ice on the surface; an incongruous sight against the backdrop of the steaming vents of the Te Maari crater, the location of the most recent eruption in 2012.
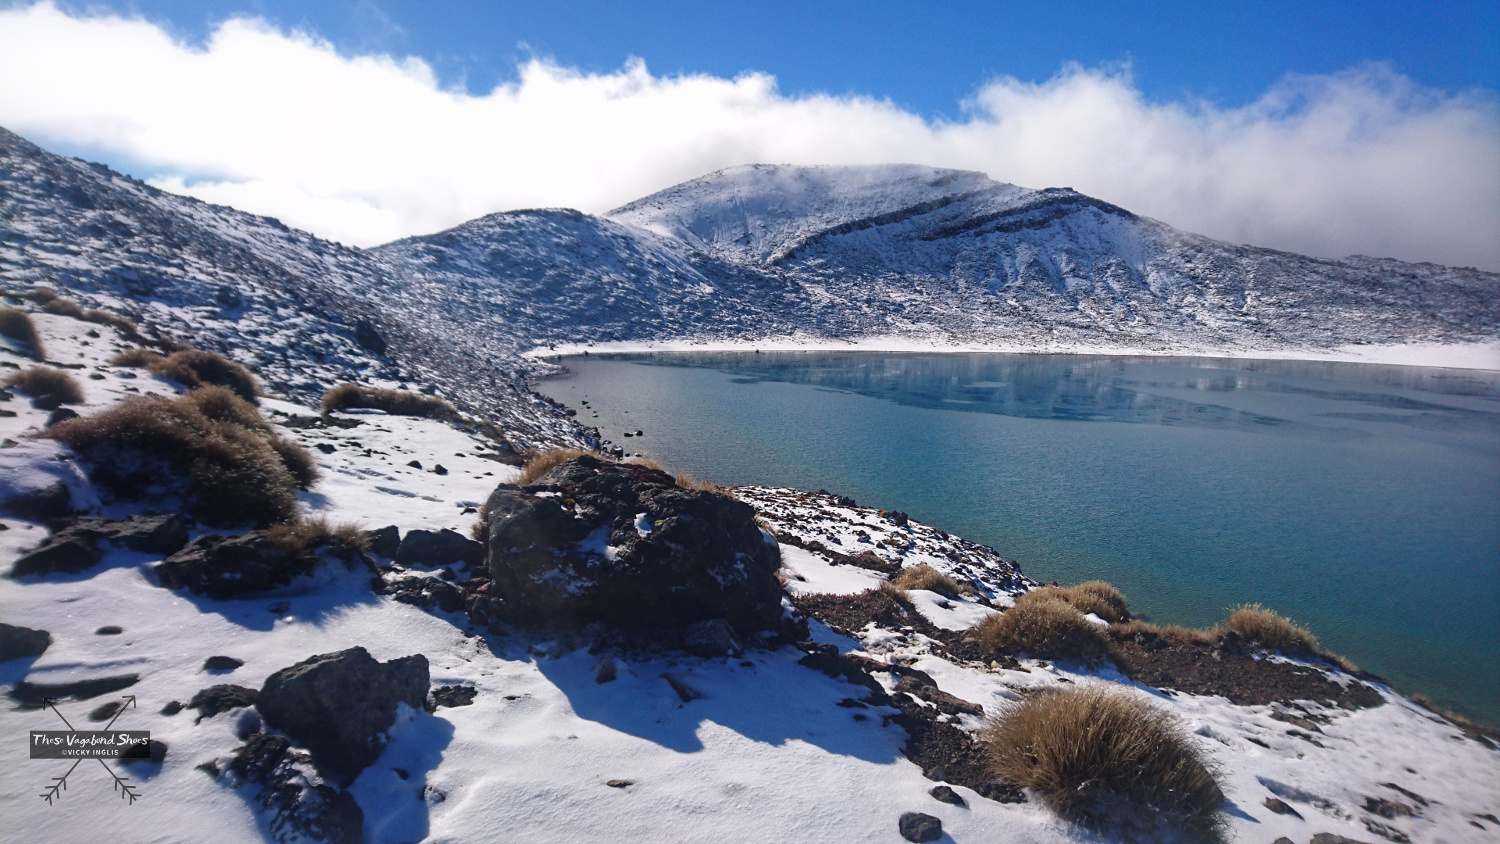
The Blue Lake is known in te reo as Te Wai-whakaata-o-te-Rangihiroa, the mirror of Rangihiroa. Rangihiroa, and his brother Te Maari, were some of the first explorers to traverse the region in around 1750 CE, and their decedents were involved in the establishment of the National Park in 1887.
The lake is considered sacred (tapu), and trampers shouldn’t enter the water or consume food and drinks whilst on the lakeside.
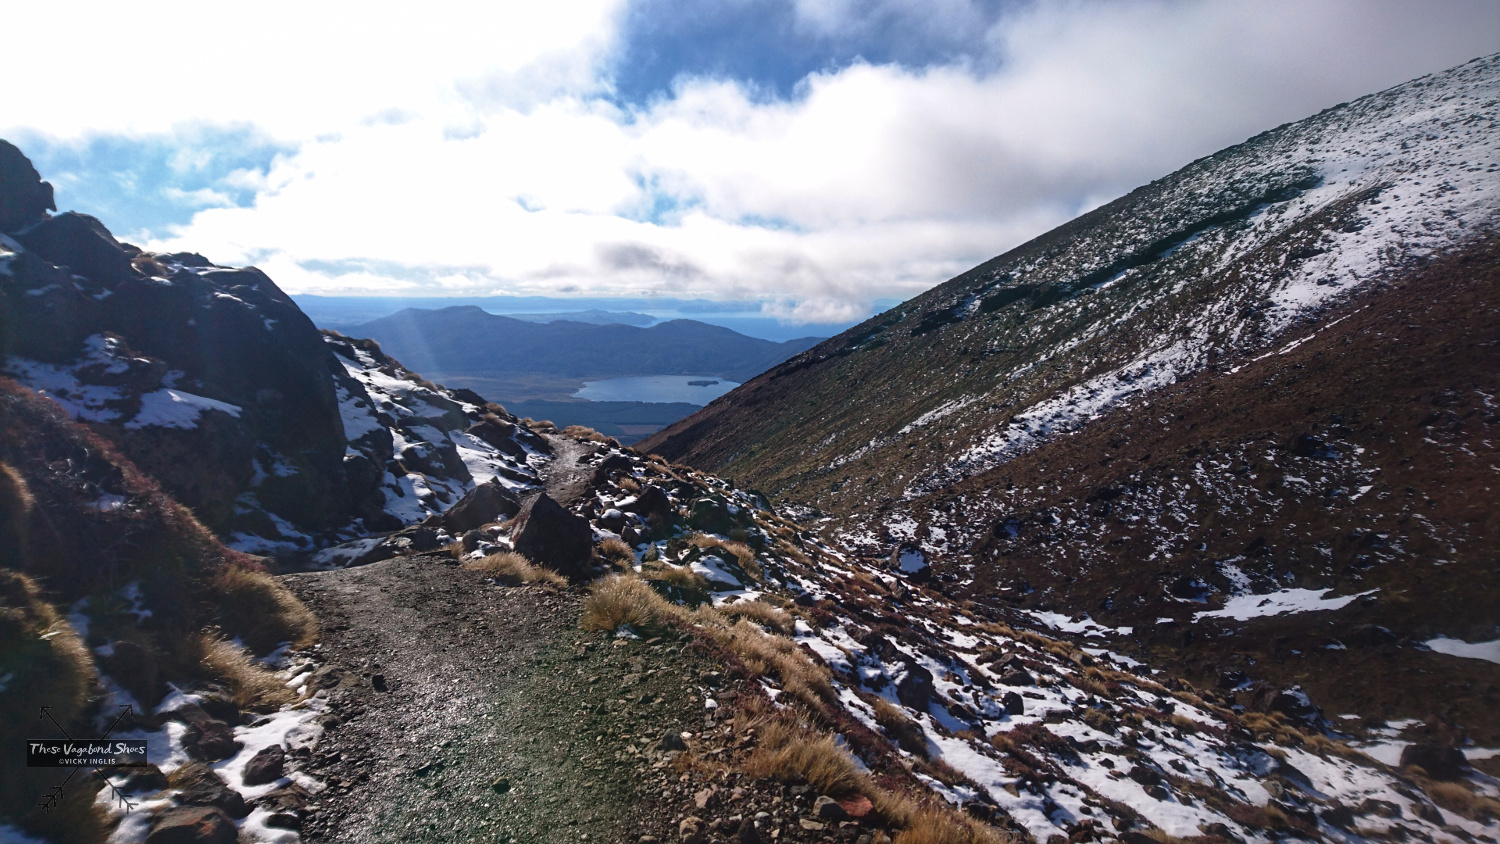
Blue Lake to Ketetahi Hut (approx. 1 hour)
From the Blue Lake, the trail makes a long, gradual ascent to the saddle next to the North Crater, giving the feeling of a lingering departure from the otherworldliness of the volcano to return through a portal to the tussocky mountainsides characteristic of the central plateau.
The trail leading down to Ketetahi Hut has been reinforced with a plastic mesh to reduce erosion over the pumice rock, and distracted by the first glimpse of the hut in the distance, I stepped on the very edge of the mesh, got unbalanced and fell over in the vegetation, rolling my ankle on the way down. I was back up on my feet again before anyone saw (though they probably heard the loud swearing as I fell).
The initial shock passed quickly, and the sprain was mild enough to continue on to the hut unaided, albeit taking much greater care about where I put my feet for the next couple of kilometres. I was pretty glad to finally reach the hut, the location of the first toilets since Soda Springs, near the start of the trail, and stop for a rest.
Ketetahi Hut was damaged in the 2012 eruption, when volcanic ballistics the size of loaves of bread smashed through the roof. Damage was still evident as I peered through a window, and why the hut is no longer used for accommodation on the Northern Circuit route. But the veranda is sound, and a great place to stop and take in the panoramic view over Lake Rotoaira to Lake Taupo.
I gave my ankle a rest for 20 minutes or so while I finished off my packed lunch in the afternoon sun, then tightened up my boot laces to continue walking. Not that far left to go…
Ketetahi Hut to Ketetahi Car Park (approx. 2 hours)
From the Ketetahi Hut the trail makes a long, knee-wearing descent through the tussock grassland to the bushline, crossing an area of private land around Ketetahi Hot Springs where visitors are reminded to stay on the marked route. A very wise idea, as there are reports of trespassers being seriously scalded by straying into steaming vents.

Taking things gingerly on my rolled ankle my pace slowed up considerably, and with the unchanging views of Lake Rotoaira, it felt like I was making little progress until I reached the edge of the native podocarp forest.
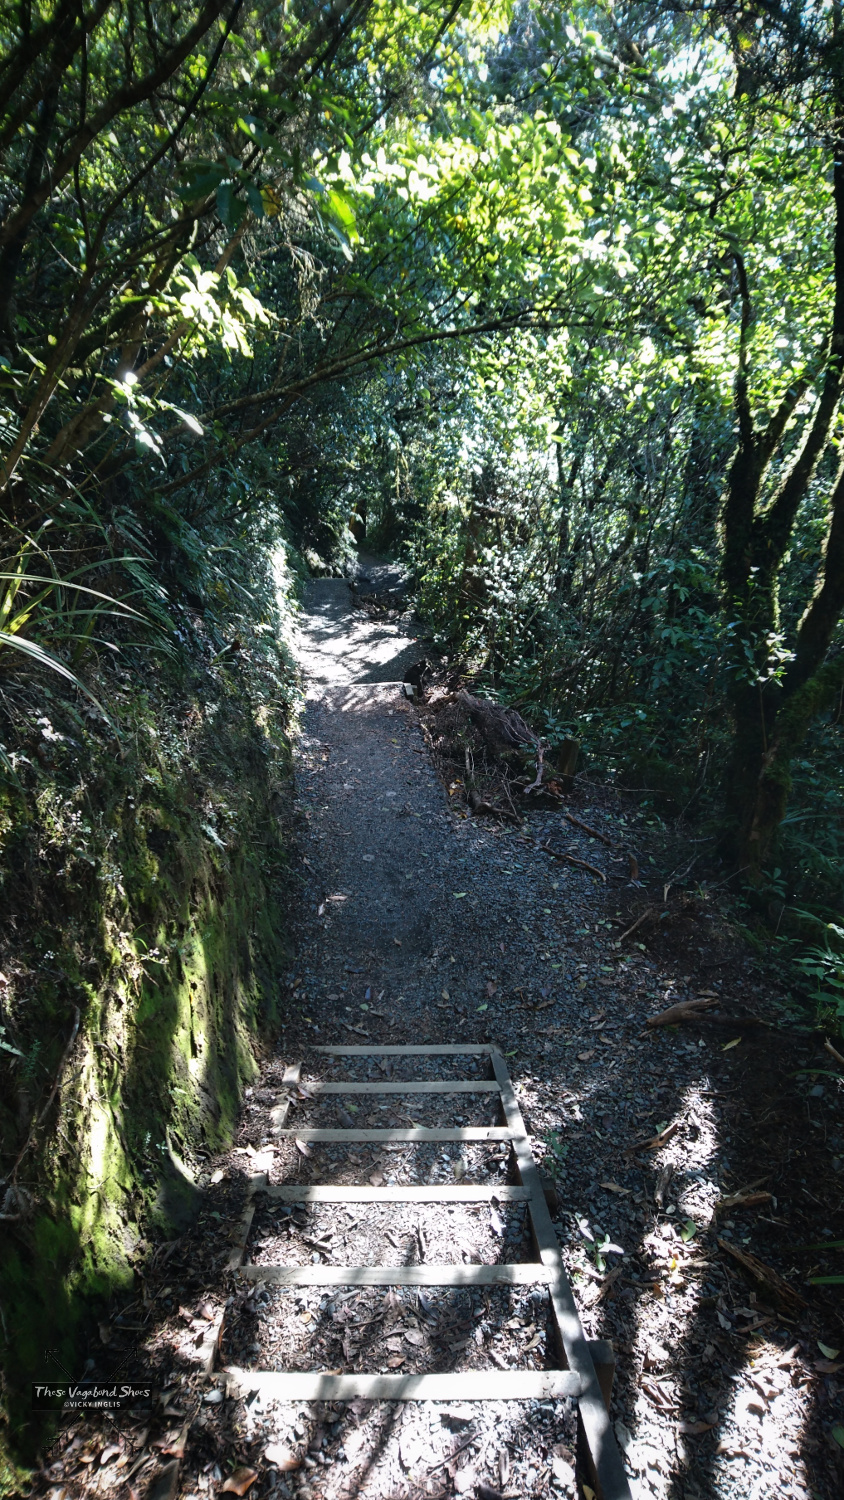
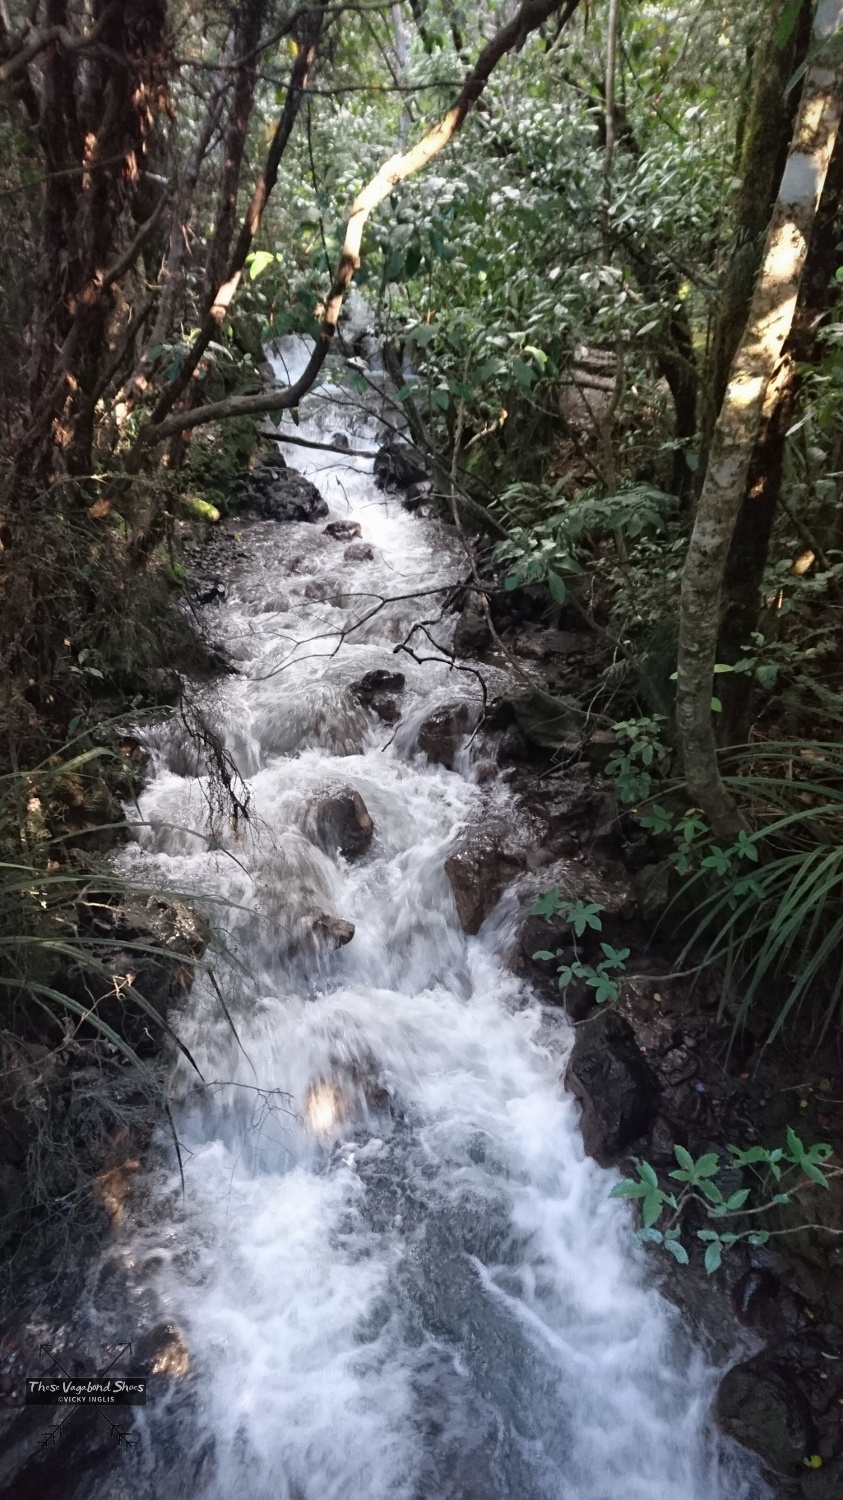
Under the shade, the trail descended to follow the Mangatetipua Stream, crossing back and forth through a lahar risk zone lines with regenerating manuka scrub, where signs warn hikers not to linger. Quite rightly, as being wiped out by a few thousand tonnes of pyroclastic mud and rock roaring down the mountain side wouldn’t be the ideal way to end your hike.
Soon I reached the welcome sight of the Ketetahi car park, and flopped down on the grass next to others from my shuttle gang to share our stories, the remains of our hiking Haribo, and wait for our bus.
What to pack for the Tongariro Alpine Crossing
Mountain weather can be quite different once you reach high ground, and a good rule of thumb for planning a hike is that for every 300 metres (1,000′) you ascend, it will be around 2°C colder. On a windy day, there will be even more of a temperature difference.
The best clothes for hiking are thin, quick-drying layers, and well-fitting, supportive boots or trail approach shoes. The Tongariro Alpine Crossing trail crosses areas of loose volcanic scree, and there can be ice and snow on higher ground at the start and end of the season, so though you’d probably be fine with supportive trainers (running shoes), hiking sandals or flip flops aren’t suitable.
Good walking trousers are robust and hardwearing but breathable, with good pockets for gadgets and plenty of snacks. Shorts will usually be ok in summer conditions, but jeans are not good for hiking, and will be really uncomfortable if they get wet.
A windproof and waterproof jacket and pair of waterproof trousers are always a good idea in New Zealand. Even if there’s no rain forecast for the day of your hike, the weather can be unpredictable, and a waterproof layer will also break the chill of the wind. I really wouldn’t recommend an umbrella for hiking, unless you’re a huge fan of travelling like Mary Poppins.
A fleece or light sweater will keep your core temperature toasty when you stop moving. Don’t wear all your layers from the start of the hike, or you’ll end up as a sweaty mess. Be bold and start cold!
A warm hat or buff, and pair of gloves can be useful for keeping warm on your stops, but don’t underestimate the strength of the sun. There’s no shade on the route between Mangatepopo and the Ketetahi hut, and the ozone layer over New Zealand is depleted. High factor sunscreen and sunglasses are essential all year round, and in summer a wide-brimmed hat and something to cover your shoulders will be important.
Read more: What to pack for day hikes in New Zealand.
What other equipment do you need?
- A backpack to carry your gear (with a waterproof cover).
- Trekking poles can be useful for crossing scree slopes, and will help protect your knees on the final descent to Ketetahi car park.
- A good supply of drinking water, around 2-3 litres, as there’s no places to refill bottles on the route.
- Some high-energy snacks and a packed lunch for a picnic stop. You’ll also need to carry all your rubbish out with you, so a spare bag is useful.
- Toilet paper and some anti-bac hand gel. There are toilet facilities on the trail, but they are extremely basic.
- The route is very well waymarked, so a map isn’t essential, but it will help you track your progress and plan your hiking time and breaks accordingly.
- Your mobile phone. It could be helpful in the case of an emergency (the emergency number in New Zealand is 111), and as a back-up camera, sound recorder, note taker…
- A mini-first aid kit, with plasters in case of blisters.
Solo hiking tips
I enjoy hiking on my own. It means that I’m not confined by someone else’s pace; I can stop when I want to take photos or soak in the view or explore any side tracks I discover, and I don’t have to share any of my snacks. But it does mean that I have to be completely reliant on my own skills and ability.
Make sure you’re properly prepared for the hike, with the right equipment and good clothing and footwear. Plan your hike, working out the time you’ll need to walk, factoring in any breaks on the way. Leave details of your hike with someone, and remember to let them know once you’ve returned.
The Tongariro Alpine Crossing is a popular route, so if you’re not used to hiking on your own, be reassured as you’ll meet plenty of other people through the day, and there’s always likely to be someone close by.
Logistics for the Tongariro Alpine Crossing
It’s advisable to do a bit of pre-planning before settling on doing the Tongariro Crossing. As well as getting to know the route and planning what to take in your day pack, think about how you’ll get to the start of the trail and how to get away at the end of the day. Think about how you can get an early start to make the most of your time on the mountain, especially if you’re visiting during the shoulder season when days are shorter.
Getting to the Tongariro Alpine Crossing
Like everywhere in rural New Zealand, it’s easier to reach Tongariro National Park with your own vehicle, however there’s a few things to be aware of. The Alpine Crossing is not a circular route, so you’ll need to arrange a way to get to the start of the trail to start walking, or a pick-up at the end of the route.
Parking availability is limited near the ends of the route, and during peak season (October to April) parking is time-restricted to four hours at Mangatepopo and Ketetahi, and will not give you time to complete the hike and use the shuttle service to return to your vehicle. Instead, you’ll need to leave your vehicle at Ketetahi Park & Ride, around 1km (15 minutes walk) from the main parking area, and take the shuttle to Mangatepopo to begin the hike.
If the Park & Ride carpark is full, you’ll need to have a plan B. Don’t leave your car anywhere on the roadside or abandon it in a space used for turning or manoeuvring. Don’t be the dick that obstructs access for others and potentially stops an emergency vehicle getting where it needs to go.
Shuttle Bus Services
If you’re staying locally, your accommodation may be able to arrange transport, or you can take advantage of the shuttle bus service from National Park village or Whakepapa.
These offer drop-off and pick up at the trailheads for around $35 NZD, which includes a contribution to the DOC for the upkeep and maintenance of the trail. Further afield, Tongariro shuttle buses also operate from Ohakune, Turangi (approx. 25 minutes from the trailhead) or Taupo (1 hour from the trailhead), for between $55 NZD and $70 NZD return.
Taupo and Turangi are both are well-connected to most of the North Island cities by InterCity bus, so are usually the most popular bases for backpackers and other using public transport to get around New Zealand.
In peak season you may need to book a space well in advance, though early and later it will be fine to book the evening before you want to hike. Shuttle companies usually allow around 8 hours to complete the crossing, so if you think you may take longer, have a chat with the staff when you book. It will help them to manage their service if you want to take a later return shuttle.
Mountain Safety
A benefit of using a shuttle bus service is that they will keep a note of your intentions to go hiking, and count each hiker on and off the trail, making sure no-one is left behind at the end of the day.
The Department of Conservation (DOC) website has detailed information about the route, and the local DOC or iSite office should be your first port of call before heading out on a tramp. You can buy trail maps, ask lots of questions (including finding out about the history and nature of the track), leave a note of your hiking intentions, and staff can give you the most up-to-date information on trail conditions and weather forecasts.
The Adventure Smart website is an excellent resource to ensure you prepare thoroughly and stay safe when you head out into mountain areas. And the Mountain Safety Council provide a handy online planning tool that makes sure you cover all bases before you hit the ground.
Be aware of the weather
The weather in New Zealand is famously changeable (this is the country of four seasons in one day), and you should be prepared for the sudden arrival of brutally strong winds and heavy rain that can reduce visibility to near zero. Given the alpine landscape of the trail, very cold temperatures are always possible and snow can fall at any time of the year.
Check the forecast on MetService; printouts are also usually available in hostels, iSite offices and the National Park Visitor Centre. If the conditions on the mountain seem like they will be unsafe, due to high winds, wind chill factor, or extreme precipitation, the DOC issue a “Not Recommended Today” advisory notice on the forecast, and place warning signs at the trail heads. Take heed if they’re in place, and DON’T DO THE HIKE. Sometimes the best decision on a mountain is the one to turn back while it’s still safe.
I stayed in the area for a few days to get the best of the weather for my hike. There’s several other small tramping tracks in the area well worth exploring if conditions aren’t ideal or the trail is closed on the day you want to walk, such as the Tama Lakes Track or the Taranaki Falls Track.
Tongariro Alpine Crossing FAQs
How difficult is the Tongariro Alpine Crossing?
The DOC describes the Tongariro Alpine Crossing as a challenging tramping track, so isn’t to be taken lightly. It crosses steep terrain, loose scree slopes, lots of steps, and uneven ground, and at just short of 20km with 765m of ascent, it’s a fairly long day of walking outdoors. Some sections are steep and exposed.
Preparation and planning is key, so making yourself aware of the features of the route and the conditions you might face will help ensure that it isn’t overly strenuous. And the incredible beauty of the mountain scenery, and sense of achievement you’ll feel at completing the hike, makes it so worthwhile.
How long does it take?
It will depend on factors like personal fitness, how often you stop, and whether you choose to take any of the side tracks. The usual timeframe is between 7 and 8 hours. I made pretty good time at just a shade under 8 hours, including the additional time for the diversion to the summit of Tongariro and a generous lunch stop.

When is the best time to do the Tongariro Alpine Crossing?
The Tongariro Alpine Crossing is a popular day hike, and forms part of the multi-day Tongariro Northern Circuit, so it can get really busy through the peak summer season in December and January. In late spring, October and November, and autumn, April and May, there’s still a good chance of fair weather and there will be fewer people around. A weekday will usually be quieter than the weekend.
I did the trail in early June on a beautiful bluebird day, and as you can see from the pictures, a couple of inches of snow was lying on the highest parts of the mountain. It was cold starting out, below freezing between Mangatepopo and Soda Springs, but after the sun climbed high enough, conditions on the mountain were great. There was some ice on the ascent from the South Crater, but nothing that was impassable without crampons. I spent a few days in the area to have my pick of the best weather conditions.
Are there toilets on the Tongariro Crossing?
Yes, as well as toilets by the carparks at Mangetepopo and Ketetahi, there’s several long-drop type toilets located every few hours along the route. Given the popularity of the track with hikers, they’re an essential feature but they are not luxurious in any way. Take your own toilet paper and anti-bacterial hand gel. If you get caught out between toilet stops, be sure to remove everything and leave no trace on the mountain.
Is there a charge to hike the Tongariro Alpine Crossing?
No, the Tongariro Alpine Crossing is free of charge to hike. The cost of shuttle transport to the trail head includes a small contribution to the DOC for maintaining the track and providing toilet facilities for hikers, but at present, there is no entry fee or permit system for the track.
Hikers on the Tongariro Norther Circuit tramping track pay a charge which permits them to camp or stay overnight in the huts along the route. Depending on the time of year, accommodation in the huts will need to be booked well in advance.
Can I fly my drone?
No, not at all. Tongariro National Park is a drone-free zone, and you’ll find signs at the trailheads to reinforce this. Be sure to thoroughly research where you’re allowed to fly drones in New Zealand, as you could face a fine of up to $1,000 NZD if caught in the wrong spot or without the right permit, and recently tourists had their drone confiscated after flying them over the Tongariro Crossing.
Flying drones in New Zealand is tightly controlled, and requires permission from the owner of the land you’re flying over. The DOC issue permits for commercial and recreational drone flying at some National Parks, but you should always make the assumption it is not permitted until you are informed otherwise.
Am I fit enough?
The Tongariro Alpine Crossing is a challenging undertaking, and shouldn’t be underestimated. If you’re not used to walking on uneven ground, loose rock, and steep terrain, it can sap your energy reserves and put unusual strain on your body. Be honest about your present level of fitness, and any training you might need to do beforehand.
The hike usually takes between six and eight hours to complete, with some challenging ascents and descents. If you do aerobic exercise regularly, and don’t have any injuries or aches and pains, then it’s likely you’ll be absolutely fine. However, if you rarely exercise or walking up a couple flights of stairs leaves you short of breath, I’d recommend taking some time to prepare before attempting the hike. There’s so many spectacular short hikes in New Zealand you can use to build up your fitness.
Read more: 11 Great Day Hikes in New Zealand.
Consider that personal fitness is just one factor in whether you should attempt the hike. Be aware of changing weather, conditions on the mountain if there’s ice or snow underfoot, and how others in your group are getting on. The Devil’s Staircase, between Soda Springs and South Crater is a good test of abilities and experience, and where you should consider whether to continue or not. There’s no shame in turning back if it doesn’t feel right, for any reason.
Is it safe to hike on a volcano?
Tongariro National Park is an active volcanic area, and both the Alpine Crossing and Northern Circuit routes pass through the hazard zone. The most recent eruption from the Te Maari vent was in 2012, so nothing can be completely ruled out.
Given the tragic events on White Island / Whakaari in 2019 due to unexpected volcanic activity it’s advisable to read the guidance from the DOC on what to in the event of an eruption, and check with the local DOC visitor centre or iSite for up to date information. You can also keep tabs on the current levels of geological activity in New Zealand on the Geonet website.
The Tongariro Alpine Crossing in Winter
In winter, between June and October, the Tongariro Alpine Crossing is usually snow-covered and you’re likely to experience sub-zero temperatures on the higher parts of the route. The route is considered challenging, needing specialist mountain skills and additional equipment like crampons and an ice axe.
An avalanche transponder and a snow probe should also be considered essential winter mountain kit for the Crossing. There’s a very good chance snow and ice will obscure the track, and parts of the route pass through areas with a high avalanche risk. An up-to-date avalanche forecast can be found on the NZ Avalanche Advisory Service website.
It will take longer than usual to complete the crossing, around 9 hours, and daylight hours are reduced, to between 9 and 11 hours. Because of this, it is highly recommended to go with an experienced guide, which can be arranged through the Tongariro National Park Visitor Centre. A winter guided hike will cost between $160 and $200 NZD.
If you’re thinking about the Tongariro Alpine Crossing, I hope this guide helps your planning. If there’s any questions you want to ask, just drop a comment below.
Dreaming about the Tongariro Alpine Crossing on your trip to New Zealand? Why not pin this to your travel planning board?

One thought on “Tramping the Tongariro Alpine Crossing: A guide to the best day hike in New Zealand”